Quantcast
Channel: GRAPHISOFT Help Center
Viewing all 1140 articles
Browse latest View live

About BIMx

$
0
0


bimx--bimxdocslogo The GRAPHISOFT BIMx is a professional BIM project viewer featuring BIMx Hyper-model, a unique technology for integrated 2D & 3D building project navigation. BIMx Hyper-models offer extremely smooth handling and outstanding performance even for projects with complex/large 3D building models and excessive 2D documentation.

BIMx News

BIMx 2015 Q3 Update – BIMcloud connection taken to the next level

iOS App version 15.3.58

  • Join a BIMcloud Teamwork project from BIMx to enable BIMx PRO functions
  • Attach Camera Photos to the BIMcloud Teamwork messages
  • Create schedule sheets with interactive web page and email address hyperlinks

Android App

BIMx 2015 Q2 Update – Direct Cloud Storage Access

iOS App version 4.0.2809

The latest BIMx update released together with ARCHICAD 19 presents four new features on iOS devices:

Android App version 3.5.3510

This new update introduces BIMcloud messaging from your Android device as well as compatibility developments to support BIMx files exported from ARCHICAD 19.

BIMx 2015 Q1 Update – Simplified licensing with BIMx PRO

iOS App version 3.6.353

BIMx Docs has been renamed to BIMx PRO. This change doesn’t affect the existing features in any way and doesn’t contain any addition to what BIMx Docs had. With the update BIMx Docs becomes BIMx PRO.

Simplified Licensing

GRAPHISOFT simplifies BIMx licensing options for iOS devices. From this point two licensing options are available:

  • purchasing a license for all models on one device (suitable for architects)
  • sharing a license for one model with other parties for an unlimited amount of time (architects can share the model with all AEC stakeholders)

 Just like before, BIMx is the free app offering In-App purchases and BIMx PRO is the paid app containing all extras by default. Read more about the new simplified licensing options in our BIMx Licensing article.

Faster Model Download

This update brings a significant improvement to model download speed. Larger file downloads from the BIMx Model Transfer cloud service remain stable even when the app is in the background.


Explore

BIMx provides 3D environment to explore full BIM models with game-like navigation on mobile devices or on desktop computers.

BIMx on Mobile Platforms

iOS: iPhone/iPad/iPod Touch

The latest versions of BIMx and BIMx PRO are available from the App Store. See the Downloads section for further details.

Android

The compatible version of BIMx is available as a free download at the Play Store and at the Amazon Appstore for Kindle Fire (2nd generation and HD) devices.

BIMx Desktop/ Laptop Viewer

The GRAPHISOFT BIM Explorer (BIMx) package is included in ArchiCAD 17 for free. The BIMx Desktop Viewer can be downloaded separately from our website.


Downloads

Before downloading BIMx, please read the System Requirements and the recommended video cards for BIMx. iOS See also: About BIMx license types

BIMx for iOS devices in the App Store

  • BIMx PRO: Fully functional application – purchase at download
  • BIMx: Free application offering in-app purchase options

BIMx for Android devices in the Google Play Store

Android

  • BIMx: Free application with the in-app purchase option for full functionality

BIMx Desktop/ Laptop Viewer

Win


Export

AC-BIMx Create an interactive, 3D presentation package at any stage of your ArchiCAD project, check out the tips to export ArchiCAD Models for BIMx.


Share

BIMx Shortcuts The interactive 3D building models can be shared on the BIMx Model Transfer Site. Upload your BIMx Hyper-model from ArchiCAD, or share it through the BIMx Desktop App with an ease. The uploaded model can be sent to the Client with a simple link.


Troubleshooting

In this article you can find a collection about the discovered known issues with BIMx: BIMx Known Issues


ARCHICAD STAR(T) Edition 2015

$
0
0

See also: StartEdition

ARCHICAD STAR(T) Edition 2015 was released on February 2, 2015. Based on the industry-leading Virtual Building technology of ARCHICAD 18, ARCHICAD STAR(T) Edition 2015 has been tailored to the needs of smaller architectural practices. ARCHICAD SE2015 contains all the tools necessary to create the building information model from which the entire architectural documentation is derived.

STAR(T) Edition 2015 introduces a wide array of modeling and productivity improvements focusing on the most requested customer wishes. provides the full power of ARCHICAD 18’s one-of-a-kind, end-to-end BIM-based documentation workflow, allowing the model to stay live until the very end of the project: it simplifies the modeling and documentation of buildings even when the design contains a high level of detail.

Enhancing overall performance with improvements to computing speed and power come from GRAPHISOFT’s commitment to expanding the possibilities available to the architect. Designers will also benefit from improved workflow and other features.
IFC Support ensures the smoothest workflow in collaboration with engineers. Sophisticated 3D editing enhancements ensure the most precise input.


Compatibility

STAR(T) Edition 2015 supports the following operating systems:

*Suitable for running ARCHICAD 18, but not tested by GRAPHISOFT.
**There might be a few compatibility issues. Please check the El Capitan page for more details.

 Can read files created with:

  • STAR(T) Edition 2006 or newer versions
  • ARCHICAD 8.1 and 9

START(T) Edition 2015 files can be opened with:

START(T) Edition 2015 protection key:

  • You can use Start Edition with a dongle which has full ARCHICAD license on.

Version Comparison

Check the new features comparison chart to see the differences between ARCHICAD 18 Full and StartEdition versions: Version Comparison


New Features in STAR(T) Edition 2015

morph.jpg Modeling Enhancements
SE 2015 features various modeling enhancements:
Air Gaps in Composite Structures: Correct Display & Handling
Building Materials: Expanded Properties & Tags
Edit Multiple Elements Simultaneously w/ Visual Feedback
Composites Without Cores
slanted.jpg Enhanced Mark-Up tool features
Mark-up tool features has been enhanced in order to make collaboration easier. Now you can make pictures of the 3D window, and attach it to the Mark-up entry to make it even easier to understand
drawing.jpg OPEN BIM and collaboration (IFC/BCF)
ARCHICAD Start Edition 2015 supports the import/export and data structure of the latest IFC standards. BIM Collaboration Format (BCF)-Based Data Exchange is now also supported. Scheme-Driven IFC Data Management and Export makes it even easier to handle IFC properties, and other minor improvements make SE2015 a much better tool for collaboration.
3d.jpg Enhanced PDF support
Link PDFs in your project from the file menu or with a simple drag & drop and handle them dynamically with ARCHICAD Start Edition 2015. PDF export is also enhanced, now supporting exporting with layers.
3d.jpg Easier and more flexible handling of External Content and Atrributes
The handling of External Files and Attributes have become easier and more flexible.

Mac OS X 10.11 El Capitan

$
0
0

Apple has released MAC OS X 10.11 on the 30th of September, 2015. Please note that in MAC OS X 10.11 the current builds of ARCHICAD versions contain a critical problem. (There are also some not critical ones with reasonable workarounds.) The critical issue is that drop-down menu items used by ARCHICAD at various parts of the user interface are not selectable.

You can see the list of compatibility of different ARCHICAD versions and the schedule of Compatibilty Updates below.


Compatible ARCHICAD versions

Summary by versions

ARCHICAD 19: Supported Builds: ARCHICAD 19 Update 4011 for  INT, USA, UKI, GER, AUT, NZE, AUS, FRA language versions (already available through the Automatic Update System). Temporary Compatibility Update (build 4006) is available for the remaining language versions.

ARCHICAD 18: Supported Builds: ARCHICAD 18 Update 7007 for  INT, USA, UKI, GER, AUT, NZE, AUS, FRA language versions (already available through the Automatic Update System). Temporary Compatibility Update (build 7000) is available for the remaining language versions.

ARCHICAD 19 Solo: Supported Builds: ARCHICAD 19 Solo Update 4003 for INT and UKI language versions (already available through the Automatic Update System).

ARCHICAD 18 Solo: Supported Builds: ARCHICAD 18 Solo Update 7002 for INT, UKI and KOR language versions  (already available through the Automatic Update System).

ARCHICAD SE2015: major issue is present in Build 6000 or older, don’t upgrade yet to MAC OS X 10.11

  • Updates are planned to be available starting from the second half of November.

 
ARCHICAD versions 17 and older, 17 SOLO and older, SE 2014 and older: Do NOT upgrade your MAC OS to MAC OS X 10.11. These versions will not be supported on MAC OS 10.11.


Upgrade checklist

  • Study this article for any known issues, difficulties
  • Back up all of your ARCHICAD / BIMcloud / BIM Server specific data before upgrading the operating system
    • Export all BIM Server Projects, Users, Roles in case these backups will be needed
    • Make sure that you have a copy (source folder) of all BIMcloud BIM Server libraries
  • Allow yourself enough time for the upgrade, do not upgrade the OS close to a deadline
  • Install all current operating system updates and ARCHICAD updates prior to the upgrade
  • Upload all Software keys to the License Pool
  • Return all borrowed licenses
  • Upgrade the operating system
  • Install all updates for the new system

If migrating to a new computer please see Transferring data between computers with Apple’s Migration Assistant topic of this article below.


Known issues

Can’t select menu items from drop-down menus in ARCHICAD 19 or older

Affected versions: 19 or older | Severity: there is no workaround

When you try to select a menu item from a drop-down menu in ARCHICAD, the previous setting stays active. There is no workaround for menus that are only available as drop-down, but if you can find the setting on a different panel, you can use the option from there (for example you can’t set the Renovation status from the default settings panel, but you can apply it from the Renovation Palette).
{i} note: Fixed in ARCHICAD 18 Update Build 7007 and ARCHICAD 19 Update Build 4011. This issue is also fixed in the Temporary Compatibility Update.

Interactive schedules are empty in ARCHICAD 18

Affected versions: 18 | Severity: workaround applicable

The interactive schedules are displayed as if they were empty when opened in ARCHICAD 18 under OS X 10.11 El Capitan

schedule resize

Workaround: Resize the schedule window. Reopening the schedule window is not sufficient, the content will possibly still be invisible, it has to be resized!

{i} note: We plan to fix this issue in a future Update of ARCHICAD 18

ARCHICAD becomes unresponsive, because second level dialog box jumps behind the first if you close a third level dialog box

Affected versions: 18 and 19 | Severity: workaround applicable

If you open 3 dialog boxes (each one from the previous dialog box), and close the 3rd one, you might notices that the 2nd dialog box disappears, and you can only see the first one, but it’s unresponsive. This is because the second dialog box jumped behind the first one, and that’s the one that’s actually active. Let’s see an easy example to help better understand the problem:
1. Open a Default settings dialog (1st dialog)
2. Choose the “Favorites…” button from the top left (2nd dialog)
3. Choose “Save Current Settings as Favorite” (3rd dialog)
4. Cancel the upcoming dialog
5. The 2nd panel should be behind the first one now

Workaround: You can either drag the first dialog out of the way to reveal the active dialog box, or just press CMD+TAB twice.

{i} note: We plan to fix this issue in a future update of ARCHICAD 18 and 19.

ARCHICAD 18 and Start Edition 2015 can’t save texts on PDF, when using the Save As… option

Affected versions: 18 and SE2015 | Severity: workaround applicable

If you try to use the Save As… option to save a PDF in ARCHICAD 18 and SE2015, texts (Text, Dimension Text, Label Text, etc.) won’t be saved on the layouts.

Workaround: In ARCHICAD 18, the publisher saves PDFs correctly. In SE2015, you can use the Operating System’s own PDF saver tool from the print dialogue.

{i} note: Fixed in ARCHICAD 18 Update Build 7007. This issue is also fixed in the tTmporary Compatibility Update.

Migrate Teamwork Project Dialog closes when “Open another project is selected”

Affected versions: 19 or older | Severity: workaround applicable

If you try to migrate multiple Teamwork projects to a newer version BIM Server, using the “Prepare for Migration…” option, and at the end of the preparation phase choose “Open another project”, the dialog closes. You can still migrate the project that you prepared.

Workaround: Migrate your projects one-by-one.

ARCHICAD 19 becomes unresponsive with the latest Public Beta Update (Version 2-4, Solved in Version 5)

Affected versions: 19 or older | Severity: solved

ARCHICAD becomes unresponsive after a few seconds of use. The application window can still be moved around, but no other interaction is possible (You need to Force Quit the application). Please do not update, if you haven’t done it yet.

{i} note: The issue is fixed with Public Beta Update Version 5.

App Nap

Affected versions: 19 and older | Severity: workaround applicable

App nap is a great  feature to help to save battery life. When this feature gets enabled, applications that run in the background will be slowed down.
There are situations when ARCHICAD works in the background (e.g. drawing update) and you would like to run it on full speed.

Workaround: To keep ARCHICAD alive in the background; disable App nap for the ARCHICAD.app. This is highly recommended for all Teamwork (BIMcloud, BIM Server) users.

  • search for the ARCHICAD applications in Finder: \Applications\GRAPHISOFT\ARCHICAD <version>\ARCHICAD.app
  • select the app an pull up the context menu, by right click or ctrl click
  • select Get Info
  • check Prevent App Nap checkbox

If App Nap is on, and you are working in Teamwork, App Nap might terminate the connection with the server, and you might even need to restart ARCHICAD in order to get it online again.

App nap should be turned off for BIM Server Manager and BIM Server Control Center (applications in the BIM Server folder) because App nap might prevent the server to run smoothly.
v18+ BIM Server and BIMcloud is not affected.

Info Tag can’t be displayed in ARCHICAD 18

Affected versions: 18 | Severity: there is no workaround

In ARCHICAD 18, the Info tag won’t be displayed, when you hover over an item with the Arrow tool. You need to select the item, and see it’s settings in the selection settings window. The issue only affects ARCHICAD 18.

Hotlinks are indicated as missing

Affected versions: 19 and older| Severity: workaround applicable

If hotlinks are linked from a network share that gets unmounted in the background, ARCHICAD is not mount the share back.

Workaround: Re-mount the share in Finder and re-start ARCHICAD.

Mounted drives disappear in the ARCHICAD file dialog

Affected versions: 19 and older| Severity: workaround applicable

Mounted volumes can disappear from the left panel of the ARCHICAD file dialog (e.g. open file dialog, add library dialog, hotlink dialog). The problem crops up when the file dialog is brought up again after browsing into a folder of the mounted drive. The roots of this issue lie within the changes Apple made in the mounted volume handling for OS X Yosemite and it is not specific to ARCHICAD.

mounted volume disappear in file dialog

The mounted drive is still accessible via the Devices section. (Devices section can be turned on in Finder Preferences by ticking the checkbox next to the local drive.)

Publishing or Saving PDF in AC 17 from 10.10 or 10.11 client to SMB mounted 10.10 or 10.11 server results in 0 KB PDF file

Affected versions: 17 | Severity: not our bug, workaround applicable

{i} Please note that the special ArchiCAD 17 hotfix 9 Build 8004 is dedicated to fix this issue.

This issue is related to changes to the SMB protocol in OSX10.10. In ARCHICAD 18, with the new PDF engine included, the problem does not occur.

Workaround: Instead of SMB, try mounting with CIFS or AFP protocol

Hotlinks turn missing and can not be relinked in Teamwork

Affected versions: 17 | Severity: workaround applicable

{i} Please note that the special ArchiCAD 17 hotfix 9 Build 8004 is dedicated to fix this issue.

Links get lost/damaged when the hotlinks are on a mounted drive. This issue is related to the alias algorythm behaving differently in OS X 10.10 compared to previous OS versions.

Workaround: Use “one dummy user login” to access the file server. The SMB/AFP/CIFS connection to the mounted server should be established with ONE and ONLY ONE login info. (In teamwork all users can use their own account this is only important for mounting the server!) The hotlinks have to be relinked once the users are all using the “dummy user login” but then on the links will stay stable.

The installer hangs showing a spinning wheel

Affected versions: 17 | Severity: workaround applicable

ARCHICAD 17 can only be installed using Java 7 on Yosemite. If there is no Java 7 installed on your computer, Java 8 has to be downgraded to Java 7. More info about ARCHICAD and Java.
In certain cases the installer may stop at the very beginning of the installation process and show a spinning wheel. A possible solution is to open System PreferencesLanguage and Region and change the Time format to 24-Hour Time. The same needs to be set if uninstalling the software is not possible.

12hour

Based on the latest tests this only affects Regions, where the default is the 24-Hour format, but the settings is later changed to 12-Hour format. Reverting the original setting helps to resolve the problem.

Palettes disappear / turn transparent after using the “Application Windows”

Affected versions: 17 and older | Severity: workaround applicable

When using Apple’s Application Windows or Mission Control (formerly called Exposé) to switch between ARCHICAD windows, all palettes can disappear or turn transparent after returning from the overview. This phenomenon occurs when the cursor was left on an element before entering to the Application Windows.
This issue has surfaced because of the changes Apple made in the Mission Control for OS X 10.10. GRAPHISOFT reported this problem towards Apple.

Workaround: This glitch can be circumvented in ARCHICAD by turning off the Info Tag in Work Environment:

info tag work environment

Installer is damaged and can’t be opened

Affected versions: 17 and older | Severity: workaround applicable

In certain cases OS X will give the following error when you try to mount an ARCHICAD 17 or older GRAPHISOFT provided dmg downloaded from the Internet: <Installer name>.app is damaged and can’t be opened. You should eject the disk image.

Workaround: This problem can be easily circumvented by setting the Gatekeeper setting to Anywhere. After that the dmg should mount fine. The installers on the installation DVD are not affected, this issue seems to be related only to downloaded packages.

BIM Server (17 and older) doesn’t start after migrating to El Capitan

For detailed description on how to fix your Bim Server see this article.


Updating the operating system under BIMcloud and BIM Server

General recommendation

It is wise to hold off upgrading the OS of a BIMcloud, BIM Server computer unless there is a specific reason or need to do so. Do not upgrade the operating system of the BIMcloud or BIM Server until you have time to properly backup all projects, users roles and libraries. Be prepared for unexpected situations, to avoid any potential downtime that affects all Teamwork users.

Version 19 and 18 BIMcloud and BIM Server

The new versions were designed to be compatible with the built in version migration of OS X, though make sure you have a full backup before the migration.

Version 17 and older BIM Server versions

Based on our tests these versions survive the migration without any major problems, though from previous years’ experience sometimes repairing the BIM Server is required.

If there are more modules installed (like 16, 17) or if you want to be on the safe side, the best is completely re-installing the BIM Server.

  • backup all of your BIM Server data (projects, libraries, users, roles)
  • uninstall all BIM Server modules
  • upgrade the OS to El Capitan
  • install the BIM Server, only install the modules that you are actively using – this might be the prefect time to archive old projects or migrate them to recent versions
  • import back all data

Transferring data between computers with Apple’s Migration Assistant

/!\ Warning: Transferring user data to another computer via Apple’s Migration Assistant to another computer with a newer OS X version (i.e. Computer A running OSX Mountain Lion 10.8 to Computer B running OS X Mavericks 10.9) is not advised and may result in corruption of ARCHICAD and BIM Server software.

The recommendation is that you first back-up your project files and Teamwork data, then uninstall any GRAPHISOFT software from the original computer, perform the Operating System migration, then re-install GRAPHISOFT software on the new computer. Failing to do so may result in you having to fully re-install your operating system on the new computer and install all programs from scratch along with user data.


Apple hardware

Remote Key Upgrade

$
0
0

WIBU hardware protection keys (WibuKey and CodeMeter) for GRAPHISOFT products can be remotely programmed via:

If you have recently purchased a GRAPHISOFT product (ArchiCAD, BIMx, MEP modeler, license borrowing option), you will receive an empty keyplug (either a plastic teal-colored key called WibuKey or a metal key called CodeMeter) that you need to “load” through the upgrade site.

If you are an ArchiCAD subscriber, software upgrades are automatically enabled for your key as they are available. You need to use the same site to upgrade your key.


Process

  1. Install the WibuKey or CodeMeter driver from the  GRAPHISOFT’s WIBU download page. Make sure the keyplug is NOT attached while you are installing the driver.
  2. Reboot your computer.
  3. Plug the hardware key into your computer. Make sure only one keyplug is attached at a time.
  4. If you are upgrading a NET key, make sure that no one is using ArchiCAD licenses from that key.
  5. Launch an Internet browser, the best is using: Internet Explorer (on PC) or Safari (on Mac).
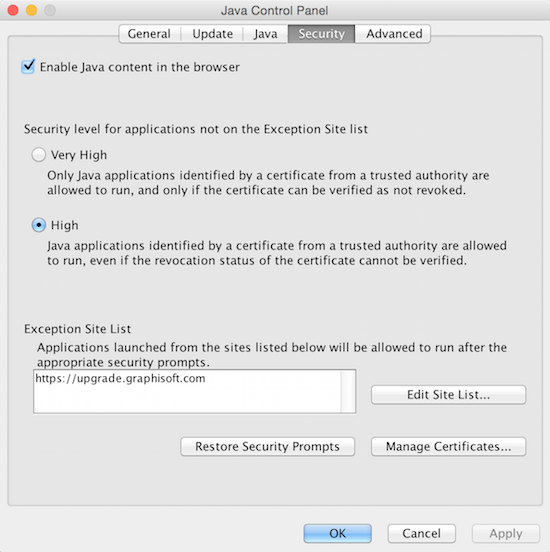
  6. Add https://upgrade.graphisoft.com to the Exception list on Java Control Panel/Securityjava_sec
  7. Visit https://upgrade.graphisoft.com – enable the Java applet when prompted.
  8. Select the preferred language.
  9. Click on the image of the key you have.KeySelector.png
  10. Select the key you would like to upgrade and click on check keyplug. (Products with 128-xxxxxxx format keyplug number are the license files of the software based license borrowing. These shouldn’t be managed here. Choose the keyplug number that starts with 2- if you have a silver/CodeMeter key.)LoadKeyplug.png
  11. In case your selected keyplug is empty, the recently purchased license will appear and be available for programming. Click Upgrade/Load Selected keyplug button at the bottom of the page.LoadKeyplug2.png
    In case your selected keyplug is already programmed, the current content and the content after this programming will appear on the page. Click Upgrade/Load Selected keyplug button at the bottom of the page.LoadKeyplug3.png
  12. Please confirm your choice by clicking OK in the upcoming windows.OK.png
  13. After the confirmation, click Start Programming in the upcoming windows. Please don’t unplug the keyplug during the process.StartProgramming.png
  14. As the last step, the programmed license will appear. Now you can unplug the keyplug.

Troubleshooting

For detailed software requirements and troubleshooting steps see: RemoteKeyUpgrade/Troubleshooting

Requirements of the License Activation Website

$
0
0

Requirements of the site

To use the upgrade site, you will need:

  • A key that is eligible for upgrade and is connected to the computer.
  • An active Internet connection.
  • Installed protection key driver :WibuKey or CodeMeter based on the type of key you have.
  • A supported Internet browser (Safari, Internet Explorer).
  • Up-to-date Java environment (you can find detailed instructions below, how to install Java).
  • Enabled Java content in the browser
    • On Mac click on System Preferences choose Java and add https://upgrade.graphisoft.com to the Exception list on the Security tab
    • On PC open Control Panel choose Java and add https://upgrade.graphisoft.com to the Exception list on the Security tab

How to install, uninstall Java

If you are experiencing problems with the site on a PC, please follow these steps:

  • In Control Panel / Add-Remove programs check what Java versions are installed on your computer. There could be several different versions and upgrades installed.
  • Remove all Java versions and upgrades. Leave no Java component at all. Before doing this, make sure no other applications are using Java.
  • Reboot your computer (don’t skip this step!)
  • Install latest Java from: Java.com

Installing 5.22 CodeMeter driver on OS X El Capitan

$
0
0

Issue

On OS X El Capitan the 5.21 or older CodeMeter drivers couldn’t be installed. 5.21 driver is part of the ARCHICAD 19, License Manager Tool and BIMcloud installers as well.

5_21

Cause

Apple introduced System Integrity Protection (SIP) with OS X El Capitan and 5.21 or earlier drivers were not prepared for this kind of security policy.

Solution

5.22a CodeMeter driver fulfils the security requirements of the SIP and can be downloaded from here.

Video Cards

ArchiCAD silent Hotfix install in different versions

$
0
0

ArchiCAD 17 or later

Silent mode Hotfix install can be achieved by running the installer from the command line with silent parameter. The correct command line can be obtained by performing the following steps:

PC

  • In the Start Menu choose or type Run
  • Drag the Hotfix installer executable over to the Run dialog
  • Complete the line with a space and the following parameter: /silent
  • Thus the line will show this: C:\Users\<username>\Desktop\ACxx-xxxx-HOTFIXx-WIN64.exe /silent
    Please note that if the path contains folders with spaces in their name, this line will be automatically put between quote marks.

Mac

  • Go to the installer file of ArchiCAD Hotfix, right click
  • From the appearing context menu select Show Package Content
  • Find ACxx-xxxx-HOTFIXx-MAC in the Contents/MacOS folder, and drag its icon onto Terminal.
  • Complete the line with a space and the following parameter: -silent
  • The complete line should look like this:
    …/ACxx-xxxx-HOTFIXx-MAC.app/Contents/MacOS/ACxx-xxxx-HOTFIXx-MAC -silent

ArchiCAD 15-16

Silent mode Hotfix install can be achieved by running the installer from the command line with silent parameter. The correct command line can be obtained by performing the following steps:

PC

  • In the Start Menu choose or type Run
  • Drag the Hotfix installer executable over to the Run dialog
  • Complete the line with a space and the following parameter: /silent
  • Thus the line will show this: C:\Users\<username>\Desktop\ACxx-xxxx-HOTFIXx-WIN64.exe /silent
    Please note that if the path contains folders with spaces in their name, this line will be automatically put between quote marks.

Mac

  • Go to the installer file of ArchiCAD Hotfix, right click
  • From the appearing context menu select Show Package Content
  • Find installer.sh in the Contents/MacOS folder, and drag its icon onto Terminal.
  • Complete the line with a space and the following parameter: -silent
  • The complete line should look like this:
    …/ACxx-xxxx-HOTFIXx-MAC.app/Contents/MacOS/installer.sh -silent

Hotfix patch file updates ArchiCAD, BIM Server and BIM Server Manager, and creates a log file next to the exe/app which will contain all found/not found and updated/not updated products, even the fact if a user on any client machine cancelled the install process because his/her ArchiCAD was running. See also Logging below.


Before ArchiCAD 15

Silent mode Hotfix install can be achieved by running the installer from the command line with the following parameter: -W play.auto=YES. The correct command line can be obtained by performing the following steps:

PC

  • In the Start Menu choose or type Run
  • Drag the Hotfix installer executable over to the Run dialog
  • Complete the line with a space and the following parameter: -W play.auto=YES /english
  • Thus the line will show this: C:\Users\<username>\Desktop\ACxx-xxxx-HOTFIXx-WIN64.exe -W play.auto=YES /english
    Please note that if the path contains folders with spaces in their name, this line will be automatically put between quote marks.

Mac

  • Go to the installer file of ArchiCAD Hotfix, right click
  • From the appearing context menu select Show Package Content
  • Find ACxx-xxxx-HOTFIXx-MAC in the Contents/MacOS folder, and drag its icon onto Terminal.
  • Complete the line with a space and the following parameter: -W play.auto=YES -english
  • The complete line should look like this:
    …/ACxx-xxxx-HOTFIXx-MAC.app/Contents/MacOS/ACxx-xxxx-HOTFIXx-MAC -W play.auto=YES -english

Notes for ArchiCAD 12, 13, 14

ArchiCAD hotfix packages will install themselves in silent mode (without explicitly using any parameters) if on the particular computer there is one and only one legally installed ArchiCAD from the entire version. Please note that the “finish” dialog will come up after the installation thus notifying the users that an installation was performed. One can make the “finish” dialog not appear: a “gshotfix.ini” file has to be placed next to the Hotfix installer file, containing this string: SilentInstall =1


Suggested scenarios for silent installations

A.) CAD Manager places the Hotfix Installer to a path publicly available from the client machines. Then either the CAD Manager prepares the login script of the client machines so that when a user logs in then the Hotfix Installer is started from the mentioned path or the users are asked to run a previously prepared batch script which runs the installer with the mentioned parameter.

B.) CAD Manager places the Hotfix Installer to the shared folders of all client machines by accessing the local machines from the CAD Manager’s computer. Then either the CAD Manager prepares the login script of the client machines so that when a user logs in then the Hotfix Installer is started from the shared folder or the users are asked to run a previously prepared batch script which runs the installer with the mentioned parameter.


Logging

When the installer is run silently, there will be a log file called AutoUpdate.log created in the same folder the exe/app file can be found, that the CAD Manager can later analize. That is why the particular user has to have rights for writing into the folder where the installer is placed. The log of one session will contain the time of the process start, the time of the process end, the user’s name, the computer name, and the info on whether the install succeded or failed. If the installation fails then the log will also contain the cause of the failure. If there is no ArchiCAD to be updated then this message will be displayed followed by an error message that the user should contact the administrator.
Please note that on Mac platform, the AutoUpdate.log file will be created only if the app file is copied out from the downloadable dmg file.


ARCHICAD crashes because of the Optimus technology

ARCHICAD crashes on Windows 7, Windows 8 because of Windows Update 2015-11-11 (KB3097877)

$
0
0

Issue

ARCHICAD 16, 17, 18, 19 crashes on Windows 7 and Windows 8 if Windows Update 2015-11-11 (KB3097877) is installed.

Cause

The recent update from Microsoft causing issues on not only ARCHICAD but on Outlook as well.

Solution

By now Microsoft published a new version of this update that (based on our experiences as well) solves the problem:

– If you already have the erroneous Update installed you can download and install a version of this update with this problem already fixed. You can access this corrected update by choosing Check for Updates in the Control Panel / System and Security / Windows Update.

– If for whatever reason this doesn’t go well and the problem doesn’t disappear please uninstall this Update by using the steps below and report the problem to your Technical Support:

  • Open Control Panel/Programs and Features/Installed Updates
  • Select Security Update for Microsoft Windows(KB3097877)
  • Click on “Uninstall” and restart the computer


2D Modeling/Editing – Troubleshooting Guide

$
0
0

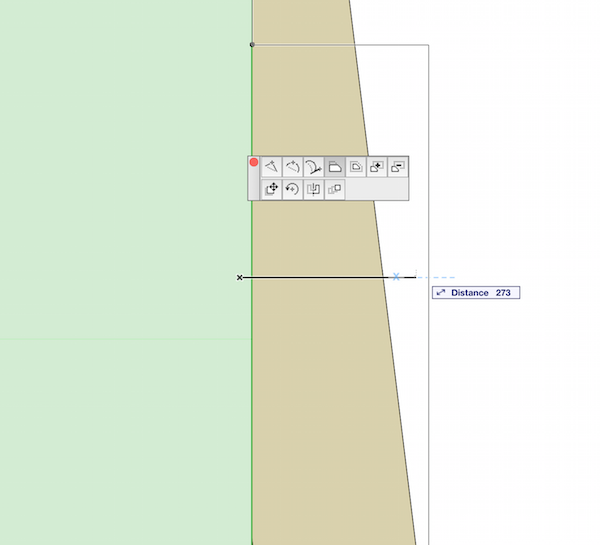
Incorrect cursor and feedback position in case when offsetting edges or nodes of polygonal elements in ARCHICAD 19 Build 4011.

Issue:

When trying to offset edges or nodes, reference point and therefore end point or edge might get wrong result in certain circumstances.

offset_edge

Solution:

The issue planned to be fixed with the next ARCHICAD 19 Update.

As a workaround: Click carefully on the edges so that the cursor is exactly above the edge or node.

Drag Multiple Copy command ends after the first copy

Issue:

Drag Multiple Copy with distance input ends the command prematurely when hitting return. The issue crops up only if the Drag Multiple Copy command is activated with the shortcut (alt + cmd on MAC / ctrl + alt on WIN) after the simple Drag command.

drag multiple copy with shortcut

Solution:

The issue planned to be fixed with the first ArchiCAD 18 Update. As a workaround:

– try placing the copies with the cursor click rather than pressing return

– try starting the command with the Drag Multiple Copy from the context menu instead:

drag multiple copy context menu

Create Guide Line with Mouse down logic in Rectangular Geometry method

Issue

Creating a Guide Line Segment from an existing custom status point using Mouse Down mode while placing a Wall, Line, etc. in Rectangular Geometry Method, the first point of Guide Line segment will be placed to the start point of Wall, Line, etc. elements instead of be placed to the existing status point.

The first image demonstrates the working with a common Geometry Method (e.g. Chained), the second shows the result in Rectangular Geometry Method.

simple_70.png rectangular_70.png

Cause

In Rectangular Geometry Method the Guide Line is calculated from the first input point of the rectangular element.

Solution

The Guide Line should be created before placing an element with Rectangular Method.

Pet Palette Disappears After Resolution Change

Issue

After reducing the screen resolution, Pet Palette is no longer visible. You may come across this issue when you connect a projector to your machine which has a lower screen resolution.

Cause

The Pet Palette’s location is relative to the upper left corner of the screen. After a screen resolution change, the position of the Pet palette might be outside the visible area. This typically happens if the default location of the Pet Palette is on the far right or close to the bottom of the screen.

LargeResolution.png

Solution

On Mac OS, Pet Palette always sticks to the edge of the screen, close to the position where it was before. It may not be well seen, but you simply have to drag it back to the desired location. Automatic hiding or Magnification of Dock might make it difficult to find the Palette, so it is advised to temporarily disable those.

SmallResolution.png

On Windows, Pet Palette always stays in its previous position, so it may completely disappear from the screen. There are two ways to retrieve the Pet Palette:

  1. Set resolution back to original and place it in the upper left area of the screen. This way it will surely be visible after the resolution change.
  2. Set Pet Palette to follow the cursor in the Work Environment Settings.

PC follow cursor.png

{i} Note, that in Windows, it is possible to place Pet Palette behind the Taskbar. Simply check Auto-hide in the Taskbar Properties or place Taskbar on the other side of the screen to regain access to the Pet Palette and drag it back to its original position.

Palette dragging issue on Mac OS X 10.9

Issue

Palettes with left side title bar could get inaccessible and cannot be dragged again on OS X 10.9 (Mavericks). This affects palettes that are placed to the border area of one display and the rest of palette is located on the other display.

Cause

Handling of multiple displays has been changed in OS X 10.9 (Mavericks). Palette dragging was controlled by ArchiCAD instead of OS.

Solution

Starting from ArchiCAD 17 Hotfix 4 (build 5005) the OS manages the handling of palettes.

There are still situations where palettes might get stuck due to an OS error. In cases like this, the best is dragging palettes by their titles. Avoid to drag it to the border area of displays, make sure the whole title stays visible and accessible.

Copy-Paste into a second instance of ArchiCAD

Issue

Error message appears when pasting elements from another copy of ArchiCAD (which was closed after copying the elements)

picture1.PNG

Cause

This behavior is a result of a speed optimization that was necessary to speed up copy/paste operations. When you copy library parts, they do not actually get copied onto the clipboard – instead they are saved into a temporary file, and only a link to the temporary file is placed on the clipboard. This is because the clipboard can not effectively handle large amounts of data.

When you close a copy of ArchiCAD, the temporary files related to it gets deleted. Therefore the clipboard content that refers to the temporary file also needs to be deleted. This is why your clipboard is empty when you try to paste the elements that you copied from the (since closed) ArchiCAD instance.

Solution

Keep the source ArchiCAD open until you paste your elements into the other instance of ArchiCAD.

CodeMeter protection known issues

$
0
0

ARCHICAD 19 (4011) and 18 (7007) cannot find licenses from Network License Key

ARCHICAD can run only in demo mode if the CodeMeter driver’s version is older than 5.00 on the License Server computer.

Solution is to update the CodeMeter driver on the license server to the 5.22a CodeMeter Driver found here.

A free license is needed for the borrow operation

UPDATE: In ArchiCAD 15 this has been fixed. (Make sure you have only one ArchiCAD session running on the computer where you would like to borrow a license.)

For the borrow operation one free license is needed. If you haven’t got a free license close your ArchiCAD on the computer where you would like to borrow a license (then this license will be free) and borrow from the CodeMeter Control Center.

  • run CodeMeter Control Center from Applications/using the Start menu
  • choose the Borrow tab
  • select the license and borrow
  • the return can be done from here as well

codemeter-knownissues--borrow

/!\ To make it possible to borrow a license using CodeMeter Control Center an inactive license file is required, which is registered by ArchiCAD. To create that first try to borrow using ArchiCAD (Help/License Information) – generate the license file by following the instruction, close ArchiCAD and borrow using CodeMeter Control Center.

Protection key is not responding

In most of the cases this error comes when ArchiCAD runs in the background. Possibly there is no problem with the protection key itself, by selecting ArchiCAD the message should disappear. Of course when loosing connection to the CodeMeter server this also appears, in that case verify the server and the network connection.

There is a know issue with the driver v4.30a: on Mac ArchiCAD cannot return from this state. With driver version 4.20d (shipped with ArchiCAD 15) this can be avoided. (the latest 4.30b driver also works fine, but note that it hasn’t been tested yet by GS)

License will be broken if not uploaded back to pool before saving with Time Machine

All the borrowed licenses should be uploaded back to the pool, before saving point with Time machine, otherwise they will get corrupted. It works like that to prevent duplication of Licenses.

ArchiCAD drops borrowed license

Issue: After borrowing ArchiCAD and MEP or EcoDesigner licenses, quitting and restarting ArchiCAD will not find the borrowed license. Either of the following will happen: In case you are offline, “protection key not found” error pops up when launching ArchiCAD. If you are online, ArchiCAD will use a network license. It’s even possible to borrow licenses again (and in this case the key server will show 2 licenses borrowed to the same machine).

Cause: If you are using CM driver version 4.20b, ArchiCAD “drops” the borrowed ArchiCAD license if you borrow an MEP or EcoDesigner license as well.

Solution: Use driver 4.20d (or later) on all related computer (server client) available from here

OSX Lion users should upgrade to driver v4.30c

On OSX Lion keyplugs may not be recognized by CodeMeter Control Center. Wibu System has fixed Lion specific issues in driver version 4.30c, so it is strongly recommended to install that on all Lion based computers. The latest driver can be downloaded from here.

Borrowing stops to work or the license cannot be returned

You can find the description of this issue here.

The computer does not start when a CodeMeter key is plugged in

This problem only occurs occasionally on Windows operating systems. The computer recognizes the CodeMeter key as an USB storage drive and tries to boot from that. Here is how you fix it:

For CodeMeter Driver version 4.30 and above

  • Search for CodeMeter Command Prompt and double-click to run it.
  • A command window will appear.
  • Type the following & press Enter or Return:   cmu32/sx-xxxxxxx –set-config-disk RemovableDisk

Where x-xxxxxxx is the serial number printed on the USB key starting with the first number digit after “SN:”
Make sure you include a space after x-xxxxxxx and disk

Example:

  • Command Prompt 002
  • As it prompts in the command window, unplug and re-plug the CodeMeter key back in.
  • Finish.

To Reset to Default:
Repeat the above using the command below instead:
cmu32/s0-0000000 –set-config-disk LocalDisk


For earlier versions of CodeMeter Driver:

  • Start All Programs/CodeMeter/Tools/CodeMeter Disk Configuration The tool should automatically find the key and list it in the left column of the window
  • Make sure that the key is selected and also make sure that under info it says version 1.16
  • Click the Options tab
  • Change Disk type to “Removable Disk”
  • Hit Apply changes
  • Eject and remove the key
  • Re-plug the key

CodeMeterFirmwareVersion.png CodeMeterDiskSetup.png

If your key’s Firmware version is lower than 1.16, then:

  • Open CodeMeter Control Center from All Programs/CodeMeter/CodeMerter Control Center
  • Click on your key
  • Check the version, and if it is lower than 1.16 then click the icon near that to update the firmware

UpdateFirmware.png

CodeMeter server does not work on Mac after 10.6.3 OSX update

In some cases the clients can not recognize the CodeMeter server running on Snow Leopard 10.6.3. In that case please uninstall the CodeMeter driver 4.10a – which comes with ArchiCAD 13 – using the install DVD of ArchiCAD

  • insert the disk/mount the image
  • browse the DVD in finder
  • run CmUninstall.app from the CodeMeter folder
  • reboot your computer
  • download the latest CodeMeter driver (4.10c) from here: Wibu download page
  • install the driver
  • set up the server again

Nothing happens when clicking on connect – first time borrowing

In case you are about to borrow the first license, ArchiCAD tries to connect to the GS server. (CodeMeter/LicenseBorrowing#InactiveLicense) There are cases where it fails – get you simply back to the previous dialog. In that case:

  • try to borrow again and use the offline way – generate request (as described here.)
  • try to import back the result file
  • if it also fails open CodeMeter Control Center
  • select the license visible there on the list (not starting with 2 or 128)
  • click on license update and use the file you downloaded from the Graphisoft site

Recycle Bin does not work while the license key is plugged in

Change the Drive letter of the key. To do that plug the key then open the Disk Manager. You can open the Disk Manager by right click on My Computer/Manage, or by Start/Run – diskmgmt.msc. Right click on ‘CODEMETER’
then select ‘Change drive Letter and Paths’. Select the drive letter and Remove it.

Cannot Return License

In case the license cannot be returned it worth it to check where the CodeMeter driver wants to return the license

  • open a CodeMeter WebAdmin
  • Content/Licenses/ click on the Product Code (61) near the Graphisoft Borrowing License
  • the Borrow Server field show the server’s name or IP

name.png
The system administrator might help how to make possible to reach the server using that name.

In many cases it is worth it to change how the server is identified by the clients. By default this is based on the server’s hostname, but in many cases the clients cannot reach the server on the name as it nows about itself. (Networks without a DNS server, mixed environment – Macs+PCs). Here you can find how to change this on the server side: CodeMeter/LicenseBorrowing#How_to_set_up_a_CodeMeter_license_server

Only the computer name identifies the server

Sometimes the value contains only the computer’s name (computer) and not the full domain name. (computer.domain.com) In the network settings it can be made possible to reach the server.

  • on Mac: Open System Preferences, Network, select the used connection type, enter the domain in the Search Domains field (domain.com)
  • on Windows: Control Panel, Network and Internet, Network Connection, select the used connection type, right click, properties, select the used protocol, properties, advanced, dns tab, enter the domain in the Append these DNS suffixes field (domain.com)

networksetting.png

Borrowing doesn’t work on Virtual Computers

License Borrowing – Act (Soft) is not supported on clients, which are virtual machines. The following error messages indicate that, during the License Update process.

Using Connect option:

connect.png

At Request file creation:

request.png

Cannot repair CodeMeter driver

On some Windows computers when running the installer of the CodeMeter driver – in repair mode – it gives Internal Error 2324.2 C:\Windows\system32\ WibuCmWeb64 .dll error message.

The workaround is to uninstall the driver and install it again.

/!\ Before doing that make sure there aren’t any licenses in borrowed state.

CodeMeter WebAdmin doesn’t open on Internet Explorer 9

Wibu has released a new driver (4.30a) where they fixed this problem, install this new driver on all related computers or use an other browser e.g. Google Chrome.

A single key cannot be used as a server key

With Wibu keys it was possible to use a key that has a single license as a server key. With CodeMeter protection you need a NET key for that.

ArchiCAD 12 cannot be started if newer versions are currently being used

Issue:

ArchiCAD 12 gives All available licenses are being used error message even there are available licenses on the license key. This only happens if newer ArchiCAD versions (13, 14, 15, 16) are running when you try to start ArchiCAD 12. Also if you have v12 running you cannot run newer versions.

Cause:

The problem is caused by a compatibility issue between the CodeMeter enabler technology and the CodeMeter driver version 4.40 (which is a default part of the ArchiCAD 16 package)

Solution:

Close all other ArchiCAD versions when running ArchiCAD 12 or close ArchiCAD 12 if you would like to run ArchiCAD 13+. In case you have a network license on your key – make sure that the license server is not running on the same computer where you use ArchiCAD 12.

BIMcloud troubleshooting checklist

$
0
0

/!\ Situation: work on BIMcloud projects is seriously hindered, most of the clients (ARCHICAD) are affected.

  1. If Teamwork is working, but the performance is extremely slow with most of the users (or with all users), then close all ARCHICAD or limit Teamwork operations (do not send/receive/reserve/release), and wait at least 15 minutes. Then start an ARCHICAD and check Teamwork again.
  2. Use “Check Connections” (in version 18) or “Run Network Diagnostic” (from version 19) function in the “Open/Join Teamwork Project” dialog in an ARCHICAD.
  3. If there is a reverse proxy installed, restart the proxy.
  4. Check the available free space in the hard drive(s) where BIMcloud Server(s) is installed. Free at least 15 percent of the storage space.
  5. Check the available free space in the hard drive where BIMcloud Manager is installed. Free at least 15 percent of the storage space.
  6. Open BIMcloud Manager User Interface in a browser and login as masteradmin.
  7. Check BIMcloud Server(s)’s status under the “Servers” panel. If the status is “stopped” try to start the server module and wait at least 2 minutes, then refresh the browser window.
  8. Check the available licenses under the “Servers” panel.
  9. If licenses are not available, open CodeMeter and Restart the CodeMeter Service in the computer where the licenses are stored. Wait at least 5 minutes.
  10. If licenses are not available, in case of CodeMeter hardware keys, unplug then plugin the keys. Wait at least 5 minutes.
  11. Open Task Manager (in Windows) or Activity Monitor (in OS X) and check the CPU/Memory/Network/Disk usage. If another application uses nearly all of the resources it is possible that this prevents BIMcloud’s proper operation.
  12. Restart the services (in Windows) or launch daemons (in OS X) manually.
  13. Restart the server computer.
  14. If computer restart did not help, contact GRAPHISOFT Support!

BIM Server & BIMcloud Backup Guides

$
0
0

Backing up your BIM Server/BIMcloud is essential to avoid data loss and minimize the time needed in case of a disaster recovery. Your backup can also be used for moving the Teamwork Projects and Libraries or even the entire installed application onto a different machine.

Teamwork Environment Components

The below diagram explains the different components of an example BIMcloud Environment focusing on the data that can be used for the recovery. The same data should be backed up for a BIM Server as well. A BIM Server setup doesn’t have the BIMcloud Proxy and the LDAP component, but these two are not included in the backup either.

Teamwork environment components

Choose backup levels

There are three backup levels to choose from according to which portions of your BIM Server/BIMcloud do you want to save off. It is strongly recommended to backup both:

  • Projects individually (1st level) in case only a Project file would get damaged, or if you would like to go back to an earlier version of the Project
  • the BIM Server/BIMcloud application (2nd level) or the entire OS of the machine (3rd level) in case the installed application itself gets corrupt

1st level – Project and Library backups

Backing up:

  • Server data of Projects (BIMProject)
  • PLN backups on the Server
  • Each user’s Local Cache (PLA)

Useful:

  • when project is damaged (most of the cases)
  • optimised for minimal data loss
Pros: Cons:
Consistent (hourly bkp) Recovery time
Automated Restore one by one
Accessible Version dependent

2nd level – Full BIM Server Data backup

Backing up:

  • BIM Server Module data
  • BIM Server Manager data

Useful:

  • when server gets damaged (rarely)
  • restore BIM Server/BIMcloud on the same/on a different machine
  • Frequency: daily (overnight – outside of work hours)
Pros: Cons:
Full BIM Server/BIMcloud recovery Synced databases required
Scripted Services have to be stopped (outside of work hours)
Can be scheduled ‘Same’ BIM Server/BIMcloud required

3rd level – Operating System snapshot

Backing up:

  • Snapshot of the Virtual Machine

Useful:

  • when OS or computer hardware is damaged (little chance)
  • quick recovery
Pros: Cons:
Full recovery (OS + BS/BC) Synced databases required
Can be scheduled Services have to be stopped
Replica server Management of VMs

Download Backup Guides

How to optimize file sizes for BIMx Mobile

$
0
0

Large, complex BIMx models can be difficult to open on mobile devices as these platforms don’t always have the sufficient hardware resources to handle the same files that work fine on desktop or laptop machines. In such cases the BIMx mobile application (for iOS and Android) quits when opening the file or it opens the model but quits when navigating in it. There are a few tricks available to tailor the BIMx model in a way that it opens both on iOS and Android devices: this article helps optimizing the ArchiCAD model before saving it in BIMx format.


Mobile Device Requirements

As a first step make sure that your device has the sufficient hardware to open BIMx files. The bottleneck at model opening is the available RAM. This is not the available storage space on the device but the memory that the applications use when they run. The GPU in the device is needed for the 3D model display.

  • Check the system requirements for mobile platforms here
  • Supported devices:
    • iPad 2
    • iPad 3 or newer (recommended)
    • iPhone 4S
    • iPhone 5 or newer (recommended)
    • iPod Touch 5th generation
    • Android based devices running Android 4.0 or newer with Tegra3, Mali602, PowerVR SGX 543, Adreno 302 or faster GPU
  • File size limitations on mobile devices
3D Model Size * ~ 35 MB ~ 70 MB ~ 150 MB
Geometry Size ** < 100 MB < 250 MB < 500 MB
Runs on Device iPad 2
iPad Mini 1
Android with 512 MB RAM
iPad 3-4, iPad Air
iPad Mini 2-3
Android with 1 GB RAM
iPad Air 2
Android with 2-3 GB RAM

* Largest 3D model that can be opened in the BIMx Hyper-model file. You can check the 3D Model Size when the 3D View is selected in the BIMx Model’s Menu. There is no file size limit for the overall Hyper-model but the upload to the BIMx Model Transfer Site is limited to 150 MB/each component of a BIMx Hyper-model.
** You can check the Geometry Size on the Info panel in BIMx Desktop Viewer.

{i} The BIMx model size that your mobile device can handle efficiently depends on many factors, including system memory, graphic card memory and the settings used for the active 3D window (global illumination, outlines, map etc.); thus, the information in the chart is only a guideline.


Optimizing BIMx files for use on a Mobile Device

Optimize the ArchiCAD Model for BIMx:

This document contains recommendations for optimizing your ArchiCAD model if you plan to save it to BIMx format, especially if you plan to view it on mobile devices.


Why should you optimize your ArchiCAD models?

Model optimization in ArchiCAD improves your 3D performance and navigation experience, even if you do not export the model to BIMx. However, the following problems may arise in BIMx in particular, due to limitations of the device used to view the BIMx file:

  • slow navigation speed and low frame rate in 3D
  • application freeze due to lack of memory
  • slow upload/download speed due to excessive file size

Optimizing the model in ArchiCAD can achieve the following results:

  • increasing navigation speed
  • allowing your projects to run on devices with limited memory
  • improving the navigation experience of your clients

Consider Limitations of Mobile Platforms

Before displaying your ArchiCAD model in BIMx on mobile devices, you must take into consideration the memory and performance limitations of your mobile device.

The main limiting factors to consider:

  • CPU
  • Memory
  • Video card

BIMx models intended for mobile devices must be further optimized compared to their desktop version.

If your model exceeds the limits of your device, you may encounter the following problems:

  • Projects which run smoothly on desktop computers may be slow on mobile platforms.
  • Some large models can’t be loaded due to the lack of memory.
  • Certain display options for the model will automatically be eliminated in BIMx.
  • BIMx models can be shared to the BIMx Model Transfer Site up to 50Mb

Optimization Essentials

You must consider two aspects of the ArchiCAD model – size and quality – and take steps to optimize them.

  • Reduce size of ArchiCAD model. Do this by reducing the number of 3D polygons and the number and size of textures. See: Optimizing Model Size.
  • Improve model quality. Do this by correcting modeling errors and taking other steps to improve navigation. See: Optimizing Model Quality.


Optimizing Model Size

Poly Count


Too many 3D polygons in the BIMx model can significantly slow down the 3D navigation. Excessive polygon count may even prevent BIMx from loading the project.

Please note that a large polygon count and large file size do not necessarily mean a big building. In many projects, a significant proportion of the 3D polygons are generated from library parts. A detailed furniture object can easily contain more polygons than the structural model of the entire building.

Thus it is essential to keep the 3D polygon count within an acceptable range. The following section contains useful tips for how you can check and control the number of polygons within your ArchiCAD project.


Model size checking in ArchiCAD: The PolyCount add-on

PolyCount is an ArchiCAD “goody” add-on that helps to analyze and control the number of 3D polygons in ArchiCAD models. The advantage of using this tool is that you can control the size of your ArchiCAD model before you export it to BIMx.

PolyCount displays the number of 3D polygons grouped by element types (walls, slabs, doors, windows, objects etc.) and their percentage compared to the complete model size.

The add-on also allows you to change the 3D detail level of certain library parts in your projects. Most objects in the ArchiCAD library include a “3D Detail Level” parameter with options for “Detailed”, “Simple” and “Off” representations. In the PolyCount dialog box, the “Default Level of Detail” function allows you to toggle between these values for all 3D objects in the projects.

Download PolyCount Add-On

The PolyCount add-on can be downloaded by clicking on the “ArchiCAD Downloads” link in the ArchiCAD Help menu. After successful installation, PolyCount can be activated from Window > Palettes > PolyCount. Please refer to the PolyCount ReadMe file for more information on using this Add-On.


Optimizing Large Hyper-Model Files for BIMx PRO
If size of the Hyper-model exceeds the capacity of the iPad/iPhone, then the BIMx PRO app will crash while loading the file. Try the following to optimize the Hyper-model:

  1. Split the model into multiple 3D views in ArchiCAD (e.g. left/right wing of the building), then publish these views to a hyper-model file. This way, you make full use of the available memory, and you can navigate among the parts views easily within the app.
  2. Skip global illumination calculation, because GI data might be a significant part of the file size.
  3. Reduce the number of model polygons by hiding the less significant model elements.

Model Size Checking in BIMx Desktop Application

The 3D model size can be checked within the BIMx Desktop Application.

Poly Count

  1. In the BIMx Desktop Application, click Esc to access the commands.
  2. Click on the Info command to see how much memory the model will use on the Desktop Application and on mobile devices.

The following information is shown on the Info page of the Desktop Application:


Memory Data for the Desktop Application

Number of Triangles: Please note that this value is approximately two or three times that of the polygon count displayed in PolyCount add-on in ArchiCAD, due to the different geometry calculation algorithms used.

RAM Usage and Video RAM Usage is given in bytes.

Components of Video RAM Usage on Mobile Devices

This data refers to the Video RAM memory required to view the model on the supported iOS mobile devices.

  • Geometry: Based on the triangle count.
  • Textures: The BIMx App automatically optimizes your textures to a certain degree, but if your BIMx model is too large to be run on your device, you can try to reduce their size and complexity.

If you save your BIMx model using Global Illumination, additional video RAM memory is required to handle the following two texture components:

  • GI of Flat Surfaces: the illumination texture applied to flat surfaces; and
  • GI of Curved Surfaces: the illumination texture applied to curved surfaces

You will notice that curved surfaces are less memory-intensive than the flat surfaces.

How to Reduce 3D Model Size

The following tips can help you to keep the ArchiCAD model size in an acceptable range:

  • Make Layer Combinations
    • Layer Combinations allow you to show only those elements of the Virtual Building model that are actually needed in the active 3D window. For example, you can create a layer combination dedicated to external views, such as renderings or elevations, in which you turn off all the elements located in the building’s interior, so they can’t be seen. Other layer combos can be defined for internal renderings or sections, in which the external trees, vehicles or other environmental elements are hidden.

    Use the Marquee

    • To show only a part of the building (e.g. a room or a story), select it with a marquee. This simple trick can significantly decrease the model size and speed up navigation in BIMx.

    Turn OFF the 3D of Unwanted Objects

    • Each library part (except for 2D symbols) that you place on the floor plan has a representation in 3D views, even if you only intend to show them on the floor plan. Moreover, many of these elements generate a large number of polygons in 3D. To avoid generating these polygons, turn off the 3D representation of these objects with the corresponding parameter on the object’s parameter list.
    • 3Doff.png
    • Since all library parts in the ArchiCAD library have the same parameter name for this function, you can select multiple objects on the floor plan and collectively turn off their 3D. You can also use the “Default Level of Detail” function of the Polygon Count add-on for this purpose. See: Model Size Checking in ArchiCAD: the PolyCount Add-On.

    Control the Objects’ Level of Detail

    • Most library parts in the ArchiCAD library have a parameter for 3D detail level (simple, detailed, off) and curve resolution. Set these parameters to the minimum that is appropriate for the required 3D view. Too many segments in a curved shape can greatly increase the
    • number of 3D polygons in a model. In some cases you can get better representation of the object with fewer polygons if you keep the 3D Detail level on “detailed” but reduce the curve resolution.
    • level.png

    Avoid Using Memory-Intensive Library Part Options

    • Some optional features of ArchiCAD objects can generate a significant number of 3D polygons without producing noticeable differences in the final BIMx models. Use the following parameters with care:
      • Handles for doors and windows
      • Taps for bath tubs and lavatories
      • Curved railings on stairs (including StairMaker stairs)
      • Too many leaves on plant objects

      handle.png

The following table shows the polygon count of some ArchiCAD library parts. Note that a single “Man Hands in Pocket” object generates as many polygons as 1066 walls! A further example that underlines the importance of polygon reduction is an office chair (Office Chair 01), which by default has 3759 polygons in 3D view – the equivalent of 626 walls. Such an office chair may be placed many times over in an office project, yet can be optimized out for purposes of BIMx navigation.

  • Element Type 3D Polygon Count
    Wall without opening 6
    Wall with empty openings 10
    D1 Door 80
    D1 Door with handle (Style 1) 1544
    Basin 01 (Detailed) 1031
    Basin 01 (Simple) 685
    Basin with tap (Detailed) 1335
    Basin with tap (Simple) 869
    Man Hands in Pocket 6396
    People Bitmap 1
    Office Chair 01 (Simple) 2594
    Office Chair 01 (Detailed Resolution = 8) 3759
    Office Chair 01 (Detailed Resolution = 16) 7433
    Car 01 5583
    Vehicle Bitmap 1
    Straight StairMaker stair/“Post with Baluster” railing 2093
    Straight StairMaker stair/“Simple Surface” railing 789
  • Pay Attention to Complex Modeling Elements
    • Advanced modeling tools such as Curtain Walls and Complex Profiles or solid operations may also produce large numbers of 3D polygons. When optimizing a model destined for BIMx, consider omitting or limiting these situations that typically produce many 3D polygons:
      • Detailed or curved Curtain Wall frame profiles
      • Detailed Curtain Wall Accessories (e.g. shaders)
      • Complex profiles with many line segments
      • Solid operations between curved elements
      • Many solid operations between model elements

    Regularly Check the Model with PolyCount

    • Data in the PolyCount dialog may help you to identify other high-polygon-count elements (in addition to regular library parts) in the model such as:
      • Complex Mesh models (e.g. site model)
      • Elements imported from external applications (e.g. 3D Studio, SketchUP, 3D DWG, Cinema 4D, etc.), which are usually very detailed models, intended for use in high-end renderings rather than architectural visualizations.

    Filter the Content of the 3D Window

    • In addition to the Marquee Tool and Layer combinations, you can filter the 3D view using View > 3D View Options > Filter elements in 3D to define which stories should be displayed in 3D.filter.png

    Use Texture Mapping

    • Use texture mapping and alpha-channel transparent pictures instead of physical models. This solution can be extremely useful if you do need a large number of trees, vehicles, fences and other complex objects in the model.


Optimization of Textures

Carefully selected and correctly applied textures will enhance the quality of your BIMx models and improve the navigation experience in 3D. However, you should pay special attention to the number and size of the texture images. Oversized image files can significantly increase the BIMx project’s memory usage and slow down navigation without noticeably improving the quality of your model. The following guidelines will help you to keep the size of your texture library in the optimum range:

  • Use the same texture images for similar finishes
  • There is no need to apply textures to elements which are not noticeable because of their size or position in the model
  • The size and quality of texture images should be reduced to the minimum. You can compare the result of using different image sizes in the ArchiCAD 3D window.
  • Prefer compressed image file formats (e.g. JPG) to uncompressed ones (e.g. BMP)
  • Use photo-editing applications to reduce the size and increase the compression level of your texture images


Shut Down Background Applications on your Mobile Device

Apple mobile devices have built-in memory optimization algorithms. Applications that you started, but are not currently in use, run in the background, consuming only minimal memory. In some cases, when you want to open large BIMx models, you might have to close all these applications to allocate the maximum amount of memory to BIMx.

  • Double-click the main button of your iPad/iPhone.
  • This will display the open applications in a row.
  • Press and hold any of these icons until the red “delete” flag appears on the icons.
  • Click each icon to close them one by one (including BIMx).
  • Start the BIMx App again and load the required model.


Optimizing Model Quality

The accuracy and precision of the ArchiCAD model greatly affects the viewer’s experience when navigating in BIMx. The following recommendations will help you to provide the best possible BIMx model for your customers:

Before you export the model to BIMx:

Carefully check its exterior and interior in the ArchiCAD 3D window (with the OpenGL engine). Check for the following modeling mistakes:

  • Missing or incorrectly applied textures
  • Too dark or too light textures and materials
  • Overlapping surfaces (the surfaces of different elements in the same plane). These will cause a flickering effect during navigation.
  • Rooms that are not accessible (missing doors, other elements blocking the entrance)
  • Unnecessary elements in the model, such as elements hidden by other elements (ducts behind the ceiling)
  • Incorrectly joined elements (walls, beams, slabs etc.)

When exporting the model to BIMx: Before you initialize the Global Illumination calculation, look at the model again:

  • Turn on the gravity and navigate across the building, checking for the mistakes listed above.
  • Return to ArchiCAD and correct the problems if necessary.

After taking these steps, save the project in .bimx format and open it with the BIMx App. If the project doesn’t fit into the memory of the mobile device, return to the ArchiCAD model and reduce its size as required.


User Interface – Troubleshooting Guide

$
0
0

Certain Palettes (e.g. Photorendering Settings and Renovation) can’t be opened

Issue

When you try to open certain palettes (e.g. Photorendering Settings Palette), nothing happens. The functions still work, you just can’t reach the palette.

Cause

The palettes actually open, they just open out of the visible screen area. This is usually because you used your computer with multiple displays, and when you quit ARCHICAD, the palette was on the other screen, so that’s the stored place of the palette.

Solution

Unfortunately, the palettes’ positions are not stored in the Work Environment, but in some system files, so resetting the Work Environment won’t do the trick. You need to connect a display to your computer again, and move the palette back to the main screen manually.
If for some reason the above doesn’t help, please contact your local support for help.

The External Conent Menu is missing from the File menu in ARCHICAD 19 Solo edition

Issue

The External Content menu is missing from the File menu therefore the Place External Drawing command and the Drawing Manager menu is also missing from the default Work Environment.

External content missing

Solution

Workaround: The Drawing Manager can be accesed from the Navigator or the Organizer.

Navigator Drawing Manager

The Place External Drawing command can be placed in the File menu or any other menu through the Options – Work Envrionment – Menus dialog.

place external drawing WE

BIMx Known Issues

$
0
0

Cursor Disappears in BIMx While Saving

The mouse and cursor disappears in the Save BIMx Model dialogue box. It is impossible to select the destination of the file in the appropriate field. The keyboard TAB can only switch between the fields “Save As” and “Tags”.

The issue occurs when:

  • opening BIMx from ArchiCAD
  • opening BIMx independently of ArchiCAD.

on OSX 10.10 with BIMx 17 and 18.

You can save your file to the default folder by hitting Enter, then you can move your file to the desired destination.

Workaround: switch to another application by using Command+TAB on your keybord then switch back to BIMx, you will find the cursor reappear.


File upload to the BIMx Model Transfer Site

Uploading BIMx Hyper-model from ArchiCAD

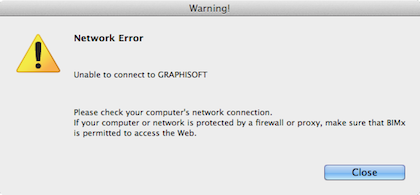
Network Error

network error ArchiCAD couldn’t submit the dongle number and used BIMx account you signed in with to the BIMx Cloud database. This could either be caused by:

  • a connection issue to GRAPHISOFT’s servers from your ArchiCAD client because of network restrictions, or
  • a malfunction at the server side not allowing the ArchiCAD client to join.

If the issue can’t be resolved by adjusting the Firewall/Antivirus software settings please send an email to BIMx Technical Support with the following information:

  • what is the exact issue (uploading from ArchiCAD or from BIMx Desktop, the error message you get)
  • your BIMx email address
  • your keyplug number (green WIBU or silver CodeMeter key)
  • the ArchiCAD Fastlogger files

Uploader is unable to connect to GRAPHISOFT. Can’t access upload location

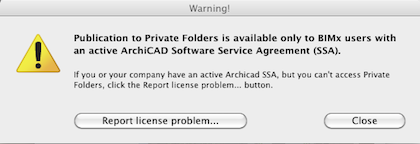
After publishing the 3D view(s) and layouts of the BIMx Hyper-model, the BIMx Uploader Application can display these errors: uploader is unable to connect to graphisoft cant access upload location_ Such error messages are displayed when the BIMx Uploader app is unable to upload the BIMx file to the chosen upload location. Most probably the chosen location is a Private Folder and the Uploader application doesn’t get permission to upload the file there. Publication to Private folders is only available for Clients with an Active SSA (Software Services Agreement) subscription. If you believe you are on this subscription please report the issue to BIMx Technical Support with the following information:
  • what is the exact issue (uploading from ArchiCAD or from BIMx Desktop, the error message you get)
  • your BIMx email address
  • your keyplug number (green WIBU or silver CodeMeter key)
  • the log files of the BIMx Uploader application.

As a workaround you can try uploading the model publicly, or use an alternative file transfer option for iOS or Android devices.

Uploading BIMx 3D file from BIMx Desktop

Network Error

network error BIMx Desktop couldn’t submit the dongle number and used BIMx account you signed in with to the BIMx Cloud database. This could either be caused by:

  • a connection issue to GRAPHISOFT’s servers from your ArchiCAD client because of network restrictions, or
  • a malfunction at the server side not allowing the ArchiCAD client to join.

If the issue can’t be resolved by adjusting the Firewall/Antivirus software settings please send an email to BIMx Technical Support with the following information:

  • what is the exact issue (uploading from ArchiCAD or from BIMx Desktop, the error message you get)
  • your BIMx email address
  • your keyplug number (green WIBU or silver CodeMeter key)
  • the “BIMx_Log.txt” and “Engine_Log.txt” files from the Users/username/Documents/BIMx folder

Upload to private folder only works with SSA

publication to private folders is only available for customers with SSA Selecting the option Upload to a Private Folder results in this dialogue if you don’t have an Active SSA (Software Services Agreement) subscription, as this premium functionality is only available for them. If you believe you have an Active SSA subscription please report the issue with the Report license problem button.


BIMx 16 doesn’t respond on Yosemite.

BIMx 16 not being usable on Yosemite, no menus or keyboard commands appear, or even scrolling is not possible.

Workaround: left-click the mouse button on the screen (the BIMx model screen) then click Esc, the Esc button now works and so do all the other keys that had been unusable before.


BIMx Desktop App/Viewer

BIMx doesn’t start

If BIMx Desktop version crashes at startup, shows only a black screen, a black screen with red lines or you see other display issues its most possibly related to your Video Card or its Driver. Make sure you have the latest driver installed for your card that supports OpenGL 2.0. In case device manager indicates Generic SVGA driver you should search for a driver written directly for your card.

Here you can find the latest drivers for the popular cards:

{i} Based on our experiences uninstalling the existing driver and installing the latest one usually solves most of the display issues. /!\ Some old graphics cards may not be able to show the model in BIMx even with the latest released driver, these are mostly really old and low performance cards. Many computers with integrated Intel graphics are affected as well.


BIMx crashes at start via Remote Desktop

Running BIMx via Remote Desktop may fail because of the limitations of redirecting the OpenGL technology to the other machine. Read more about this here. BIMx can be started only from a local profile and then joining in via remote session will be able to transfer the image of the running application from that point. It is advised to run BIMx in windowed mode in such cases.


Issue on Mac with virtualised operating systems

Running BIMx may fail in virtualised environments (such as Parallel Desktop/VMware Fusion). In some cases it works but global illumination render fails. {i} Running BIMx in a virtual machine is not recommended because BIMx is using the video card in OpenGL mode. The problem itself might also be related to the ATI Mobility Radeon video cards that are used in Macbook laptops, although this has been seen on a Mac Pro system with a desktop ATI card as well.


File error

File error message pops up if the opened file is damaged or if was saved with a newer version of ArchiCAD than the BIMx Application. error.png


Unsupported BIMx file

BIMx 17 Desktop application can’t open BIMx Hyper-models, these files can be opened with BIMx 18 Desktop app or newer and with the Android and iOS mobile BIMx apps. Unsupported file type


Save and Share to BIMx Model Transfer Site buttons are greyed out

If the BIMx Desktop Application doesn’t find a license it starts in Viewer mode. This result in that the “Save” and “Share BIMx Model” buttons  are greyed as these options are not availabe without a license. save and share greyed out If you have a BIMx license (BIMx license is integrated into the ArchiCAD license from version 17) make sure that it is accessible for BIMx.


alt text

Pixelated shadows

In some cases the shadows might be pixelated. This is usually caused by large polygon number elements, such as trees and other plants. Their detailed shadow fills up the shadow map and this results low-res shadows. A couple of ideas that might help to fix the representation:

  • hide the layer of these elements
  • use the marquee tool to only represent a part of the model
  • use lower polygon number elements

alpha channel transparency

Invisible textures

Textures with alpha channel transparency are invisible in the case they are viewed through another transparent surface.

HQ Helpcenter Page List

$
0
0

Easter eggs in ARCHICAD

$
0
0

Do you need to energize before a deadline? You do not even have to quit ARCHICAD to disconnect and have some fun. Here are some games, transformable objects and other stuff to discover.

Lean back and enjoy the easter eggs you didn’t even know about. Here is the entire collection.

Check out what easter eggs are on Wikipedia.


2048 (ARCHICAD 19+)

Who said revision can’t be fun? Well, it can with the new function of our Revision History 19 objects, and their new feature, the 2048 game. Just select one of the Revision History 19 objects (either Simple or Detailed), and set the number of rows to 4. This opens up the secret 2048 menu, in which you can find the controllers for the well-known game. You can enlarge the dialog box, to see the game table in the preview field more clearly.


Pong game (ARCHICAD 19+)

If you need a fun break in the design process, you can play the classic pong game right in ARCHICAD. To do that, you just have to hover over a Guide Line handle, click the keys P-O-N-G at the same time, and then place the cursor above a node, and wait for the blue circle to appear.
Use the cursor to move the Guide line handles, and don’t let the blue ball get out of the picture.

Pong game


Tracker Landing Game, ARCHICAD 10-13 and returns with ARCHICAD 19

Start by drawing a single straight wall while having the Tracker on demand. Then press ‘a’, type 12.345 and press ‘a’ again. Wait 5 seconds to let the game begin.
Use the arrows to control the falling tracker, and try to land it on the taskbar/dock as smooth as you can. Over 6000 points and you are good.

  • TrackerLanding.png

Lamb Cloud, ARCHICAD 18+

You can meet a nice, fluffy Lamb in ARCHICAD. How? You just have to select the Change Tool from the Toolbox, draw a rectangle, and subtract another rectangle from it to form the lamb’s body. When the body is ready, you can say hello to your new friend.


Optional ARCHICAD version Splash Screen in 30Years Anniversary Edition (ARCHICAD 18)

Would you like ARCHICAD to start up with an ARCHICAD 1 or ARCHICAD 10 splashcreen? Specify the version number and enjoy your co-workers reaction!

the text file that needs to be edited is located in

  • MAC /users/[username]/Library/Application Support/Graphisoft/ ArchiCAD30YearsAnniversaryEdition.txt
  • Windows c:\users\[username]\Graphisoft\ArchiCAD30YearsAnniversaryEdition.txt

Screen Shot 2014-07-02 at 13.58.36

Screen Shot 2014-07-02 at 14.11.49

Screen Shot 2014-07-02 at 14.06.01


Rubik’s cube

Set the following parameters for Cube 18 and watch the magic cube appear. If you place it, you can even play with it in the 3D view.

Screen Shot 2014-07-02 at 14.37.52


Update: Renovation Filter Options in ARCHICAD 16

Do you need help with the Renovation Filters? Ask our colleagues. Just double click on the preview, while holding ctrl on Win or cmd on Mac.

RenovationFilter.png


Tic-tac-toe game

Play with a co-worker, even in Teamwork. You just need to re-size an ‘Armchair 01’ object over 2 meters.

tictactoe02.png


Graffiti on a toilette door

If you have many toilettes in a commercial building sooner or later someone will scribble on it for sure. Have at least 3 toilettes in the ‘Commercial Bath Stall’.

GraffitiToilett02.png


First Person Shooter view in 3D Explore mode

Do you want a cross-hair while you explore? In a Perspective view enter 3D Explore mode and press ‘f’+’p’+’s’ at the same time.

FPS01.png


Various Teamwork message pop-up windows

Adding different numbers of spaces to the end of a Teamwork message results in different looking pop-up windows for your addressee. But do not disturb them too often.

windows01.png


Broken Window

Designing a Haunted House? You can make it even spookier by adding broken windows. You just have to choose the “Window 18” library part, and then under the “Opening” tab, choose Fixed glass for sash type, and under the “Parameters for Listing” tab, set the U-value to “Brick Transfer”.

Brick Transfer


Monster truck

If you do not have enough space for parking around your building add a brand new level of parking lots. Choose the ‘Microcar’ and add under ‘Parameters for Listing’ type ‘Monster Truck Wheels’ to the right of ‘Accessories’.

MonsterTruck02B.png


Jolly Roger, new in ARCHICAD 15

Beware of the pirate boats.

JollyRoger01.png


Could you find all of them? Then you can go and get your work done.

Reporting issues: Creating a Support Package, Fastlogger files

$
0
0

Creating a Support Package

What is a Support Package?

Creating a Support Package may help the Technical Support Team more efficiently investigate a problem you experience with ArchiCAD. The package captures the current state of your (Teamwork or non-Teamwork) project and includes other data that will help the Graphisoft team to troubleshoot the problem.

You should create a support package if a Support person explicitly asks for it. Send it to your Support representative along with a description of the problem.

How to create a Support Package

There are two ways to initiate the process.

  1. Go to Help menu/ Create Support Package

AutomatedSupportPackageCreation.png

  1. Choose the Create Package button. If you have unsaved/unsent changes, the following dialog will appear:

DiscardChanges.png

  1. Select either of the three options:
    • Discard Changes: – choose this if you don’t mind loosing the changes you made since last saving the file, and/or you suspect that your latest edits caused the problem, and you don’t want this to be saved into your file. The file will be closed
    • Cancel:– will abort creating a support package
    • Save:– will save the changes in the file or local copy and will close the file
  2. You have now reached this dialog:

CreateSuppPackageMain.png

  1. Select the type of project you want to capture, and locate it on your hard drive
  2. Fine-tune the content of the package. These are the optional components:In solo mode:
    • Project– to save on package size, and to respect your privacy, the Project file itself is not part of the default package. The support team may request you to include the project also
    • Libraries – some problems may be related to library parts. Therefore your support representative may ask you to include some of the libraries used by the project. (Do not include, however the standard ArchiCAD 13 Library)

    In Teamwork mode:

    • Model from Server – the database of the selected project in its current state on the server. This is optional to save on package size, but including this enables the support team to exactly re-create the current state of the project
    • Last Autosaved Version – this might be necessary to compare different states of the file
    • Libraries – same as in case of solo files.
  3. Write a description of the problem in the “Comment” box
  4. Hit “Create” and locate a folder where you want to save the package.

There will be two or more files created.

  • In case of solo (PLN, PLA) files:
    • <Project name>-<Date of creation of the package>.support (Project-related files)
    • <Project name>-<Date of creation of the package>_LOG.support (LOG files)

    In case of Teamwork projects:

    • <Project name>-<Date of creation of the package>.twsupport (Teamwork Project-related files)
    • <Project name>-<Date of creation of the package>_LOG.twsupport (LOG files)

{i} If any of these files would be bigger than 100MB, then ArchiCAD will save the package in 100MB-pieces. So you might find that more than one .support or .twsupport files are created. So for example a Support Package may look something like this:

  • Myproject.pln-09-07-30-17-25.support
  • Myproject.pln-09-07-30-17-25_01.support
  • Myproject.pln-09-07-30-17-25_02.support
  • Myproject.pln-09-07-30-17-25_LOG.support

What data is saved into the Support Package?

For solo files, the .support file contains:

  • ArchiCAD Preferences files
  • Files of the last WorkEnvironment folder.
  • (optionally) the project file (.PLN) itself
  • (optionally) libraries used by the project

For solo files, the _LOG.support file contains:

  • FastLogger files – These files contain programmer’s data about the last 10 ArchiCAD sessions
  • CrashSubmissionLog.txt – This contains the IDs of submitted crash reports

For Teamwork files, the .twsupport file contains:

  • ArchiCAD Preferences files
  • Files of the last WorkEnvironment folder.
  • The local copy of the Teamwork project from the “TW Data” folder
  • (optionally) the Autosave files from the “TW Data” folder
  • (optionally) the server copy of the Teamwork project
  • (optionally) libraries used by the project

For Teamwork files, the _LOG.twsupport file contains:

  • FastLogger files – These files contain programmer’s data about the last 10 ArchiCAD sessions
  • CrashSubmissionLog.txt – This contains the IDs of submitted crash reports
  • The log files from the BIM Server ( MessagingServerLogs ProjectLogs TeamworkServerLogs )

Information for Support Personnel and CAD Managers

A registry key called AutoSupportPackage controls automatic Support Package creation (it is turned OFF in default). If this key is enabled, then support package creation is automatically offered if a serious error occurs during Send, Receive or Save operations. Turn the key ON if you experience repeating errors in any of these operations.

Location of the key:

Windows 32-bit: HKEY_CURRENT_USER\Software\Graphisoft\ArchiCAD\ArchiCAD 13.0.0 INT R1
Windows 64-bit: HKEY_CURRENT_USER\Software\Graphisoft\ArchiCAD-64\ArchiCAD-64 13.0.0 INT R1
Mac*: com.graphisoft.AC 13.0.0 XXX v1.plist file in /Users/(USER)/Library/Preferences folder

Use Pref Setter to edit .plist files on Mac

Collecting files from the Fastlogger

What is the Fastlogger folder?

FastLogger is a folder created by ArchiCAD and related tools, in which binary log files are written while the program is running, in order to help with troubleshooting. The size of the folder will be a maximum of 100 MB. If you create a SupportPackage, it will also collect the content of the FastLogger folder.

What kind of information is recorded into the FastLogger folder?

  • User Interface operations
  • File and I/O operations
  • Memory usage and speed data
  • Data referring to causes of possible problems
  • Other developer information

ArchiCAD FastLogger folder location on different platforms/versions

/!\ It is required to close all ArchiCAD sessions before collecting the logs.

  • Windows XP and former version of Windows:
    1. AC13 or before: C:\Documents and Settings\<username>\Local Settings\Application Data\Graphisoft\ArchiCAD Log Folder\<ArchiCAD version>\FastLogger
    2. since AC14: C:\Documents and Settings\<username>\Graphisoft\ArchiCAD Log Folder\<ArchiCAD version>\FastLogger
  • Windows Vista and Windows 7:
    1. AC13 or before: C:\Users\<username>\AppData\Local\Graphisoft\ArchiCAD Log Folder\<ArchiCAD version>\FastLogger
    2. since AC14: C:\Users\<username>\Graphisoft\ArchiCAD Log Folder\<ArchiCAD version>\FastLogger
    3. 64 bit version: C:\Users\<username>\Graphisoft\ArchiCAD-64 Log Folder\<ArchiCAD version>\FastLogger
  • Mac OS X:
    1. System drive/Users/<username>/Library/Logs/Graphisoft/ArchiCAD Log Folder/<ArchiCAD version>/x86/FastLogger
    2. 64 bit version: System drive/Users/<username>/Library/Logs/Graphisoft/ArchiCAD-64 Log Folder/<ArchiCAD version>/x86/FastLogger

License Manager Tool Log folder locations

/!\ It is required to close all sessions before collecting the logs.

  • Windows
    • C:\Users\[USERNAME]\Graphisoft\LicenseManager
    • C:\Users\[USERNAME]\Graphisoft\LicenseManager Log Folder
  • Mac OS X
    • System drive/Users/[USERNAME]/Library/Application Support/Graphisoft/LicenseManager
    • System drive/Users/[USERNAME]/Library/Logs/Graphisoft/LicenseManager Log Folder

BIMx Uploader FastLogger folder location

/!\ It is required to close all sessions before collecting the logs.

  • Windows
    • C:\Users\<username>\Graphisoft\BIMxUploader\
  • Mac OS X
    • System drive/Users/<username>/Library/Application Support/Graphisoft/BIMxUploader/
Viewing all 1140 articles
Browse latest View live


<script src="https://jsc.adskeeper.com/r/s/rssing.com.1596347.js" async> </script>