Quantcast
Channel: GRAPHISOFT Help Center
Viewing all 1140 articles
Browse latest View live

ARCHICAD installer is held back by Norton Internet Security

$
0
0

Affected version(s): All versions | Severity: workaround applicable

Issue

ARCHICAD installer goes through all the steps and seems to finish, but nothing is installed.

Cause

File Insight of Norton Internet Security, 2010 or later, puts the file generated by the ARCHICAD Installer (LauncherMain.exe) into quarantine.

  • insight.png

Solution

You have to add an exception in Norton Internet Security by following the steps below:

  1. Open Norton Internet Security and choose Settings.01open.png
  2. Press Configure next to Items to Exclude from Auto-Protect, SONAR and Download Intelligence Detection.02setting.png
  3. Add an exception to Real Time Exclusions and re-install ARCHICAD.

{i} Note: don’t browse for the file, just enter its name manually: LauncherMain.exe

  • 03exception.png

GRAPHISOFT BIMcloud: integrated team messaging from your mobile device

$
0
0

Building-related communication between the designer/builder team can be fragmented. Using email or phone to make comments is cumbersome and separates the information from the model. That is why GRAPHISOFT developed a solution to involve the builder team directly in the BIM project collaboration by making communication possible from BIMx with sending direct feedback in the context of the model.

{i} This workflow requires an up-to-date ARCHICAD Teamwork project running on GRAPHISOFT’s BIMcloud solution and an Android/iOS device with the latest BIMx update:

Join into the BIMcloud project to get BIMx PRO functions

After the BIMcloud project has been published to BIMx PRO builders will see an option where they can join into the project as team members from their Android/iOS device. Once joined in BIMx users get all PRO functions for that project.

  • The same username & password can be used as from ARCHICAD.
  • Joining in with the same user in BIMx will not log you out from the ARCHICAD project.
  • Using ARCHICAD and BIMx with the same user account requires only one CAL (Client Access License) from the BIMcloud

Send messages and photos from BIMx

After logging in, a mail icon appears at the top right corner in the 2D and 3D views. By tapping it the messages panel comes up where you can send text messages to other team members through BIMcloud’s messaging interface. With using the attachment button you can include a 2D/3D view of the model or you can shoot a photo on the construction site that you want to directly send back to the ARCHICAD team:

join into BIMcloud project from BIMx

ARCHICAD users will see these messages the same way as if an other ARCHICAD team member would have sent them. If a 3D view of the model was attached to the message its view can be applied at the receiver’s end; this helps specifying the area you would like to comment on and therefore it makes communication within the project clear, easy and fast for both parties. On the Teamwork messaging panel it’s also visible whether somebody is joined into the project from mobile or from ARCHICAD.

Mark up screen captures and camera images in the message

Attached 2D/3D views of the BIMx file and camera photos can also be marked up for better understanding. Use the free hand redlining tool to annotate these images:

annotate pictures with free hand redlining in BIMx BIMcloud communication

BIMx Frequently Asked Questions

$
0
0

BIMx unique features

What makes BIMx for mobile devices unique compared to other 3D viewers?

Most 3D model viewers for the mobile devices are generic purpose viewers. This means their navigation functionalities are basically limited to 3D orbit, pan and zoom. BIMx has a lot more to offer than that (selective list):

  • It is a full “natural” building explorer environment – with gravity and egress recognition just to mention examples – that is with all the necessary UI features that make or break great user experience
  • It has sophisticated visual filters (views) to provide a high quality architectural presentation environment such as stereoscopic view etc.
  • It is connected to the ARCHICAD architectural model via BIMcloud, making a unique collaboration environment in the AEC industry.


Is there a difference between the iOS and the Android versions of BIMx PRO?

  • Both applications are being developed continuously. New features are generally available in the iOS app first and appear in the Android application 3-6 months later. Currently there are some features available in the iOS app only:
  • Navigation works the same way on both platforms with the 3D model.
  • There are slight OS specific differences in the user interface, location of the settings and in the file management.

Model Transfer

I have my BIM project created in ARCHICAD, how can I export it as a BIMx model?

If you use ArchiCAD 17 or newer, you have two options:

  • Save a regular BIMx 3D model from ‘File/Save as…/BIMx’
  • Publish a BIMx Hyper-model for your iOS device with the BIMx PRO functionality

If you have ArchiCAD 16 or older you can export the model with the ‘File/Export for BIMx…’ option


How can I send BIMx models to my clients?

You can use GRAPHISOFT’s BIMx Model Transfer service free of charge to share your model with others. There are two ways to upload your model:


Alternative options to transfer your BIMx models to Android and iOS devices can be found here:


How to save a .bimx file format from BIMx Desktop Viewer

Choose File/Save to save the model in .bimx format.
If the Save and Share buttons do not appear, either the file and ARCHICAD license types do not match (for details, please visit BIMx/LicenseTypes or check the Known Issues of BIMx.


BIMx Model Transfer Site

What is the BIMx Model Transfer Service?

The BIMx Model Transfer Service is a “cloud-service” to share BIMx models with Colleagues and Customers. Models on the BIMx Model Transfer Site are publicly available, but Offices with an active Software Services Agreement are entitled to an additional 5 GB of private storage as well.


How can I register my company on the BIMx Model Transfer site?

When you upload a BIMx model to GRAPHISOFT’s Could service for the first time with your protection key you will be requested to create a so-called BIMx Company Account where you can store your uploaded models. Follow the steps of the registration process here. Also, your Company gets automatically registered once you change over to software license keys.


Who can access BIMx models on the BIMx Model Transfer Site?

The BIMx Model Transfer Site is accessible in any of the following ways:

  • Through direct page URL: https://bimx.graphisoft.com/
  • Through direct links to uploaded BIMx models’ download page
  • Through built-in links from mobile devices (iPad/iPhone)

Users can search/browse and download BIMx models from the site without registration or log-in.


Who can upload BIMx models onto the BIMx Model Transfer Site?

BIMx models can be uploaded either from ARCHICAD (BIMx Hyper-model) or from BIMx Desktop application (BIMx 3D Only Model). The first time BIMx users want to publish their models to the Transfer Site they will be required to register. Consult this article to read more about setting up the upload environment.

Login to the BIMx Model Transfer Site is only required to manage one’s uploaded models (edit model details/move or delete models etc.).


What are the different ways for people to register to the BIMx Model Transfer Site?

With Registering a GRAPHISOFT ID you get access to all of our cloud services:

If you have already registered to any of the above sites you can use the same account to upload BIMx models and log in to the BIMx Model Transfer Site.


What is the difference between My models and My Company tabs in the BIMx profile?

Once signing in to your BIMx profile you can see the My models and My Company tab pages on the top dividing your uploaded BIMx models into two sections:

  • The My models tab contains all models you have uploaded from a Trial or Educational version of ARCHICAD/BIMx Desktop Viewer
  • The My Company tab contains all models you have uploaded using your Company license key

Support

How to upgrade to the latest BIMx version?

Since the release of ArchiCAD 17, BIMx is fully functional with the ARCHICAD license in most Countries (separate BIMx license is only necessary in Japan and Switzerland). To upgrade your current license please contact your local ARCHICAD reseller.


What are the system requirements for BIMx Desktop version?

For detailed description, see System Requirements for BIMx Desktop Viewer.


What are the recommended mobile devices to run BIMx?

iOS: BIMx works well with the newer iPads and iPhones having at least 1 GB of RAM available

Android: Many of the most popular Android tablets have been tested with BIMx: Samsung, Asus, Motorola, Archos, Sony etc. As a general rule, the capability of the processor, memory and GPU influence the usage of BIMx models: more models can be smoothly managed with more RAM. The performance speed (FPS) mostly depends on the capabilities of the GPU.

For detailed System Requirements please check this article. Read more on how to optimise BIMx files for mobile use.


What kinds of license types can I use to create BIMx models for clients?

For all available options see: BIMx License Types


What can cause sudden restart, quit or freeze on my Android or iOS device?

The RAM capability of your device is responsible for managing the BIMx models. If the application restarts, freezes or quits, probably the memory of the device is full and the OS stops the application. To resolve this please follow the model optimising tips in the the BIMx Optimization article.


Can I use BIMx with Start Edition or with Educational/Trial versions?

Yes, all versions have BIMx Add-On (BIM Explorer) as a default part of the ARCHICAD package.

  • the .bimx files saved in the Trial version can be opened only on the computer where they were saved
  • the Educational version’s saved files have an Educational version watermark.

Technical Questions

Where can I find the installed desktop application(s)?

Default BIMx Add-On folder:

  • Mac: /Applications/GRAPHISOFT/ARCHICAD version/Add-Ons/BIMx
  • PC: C:\Program Files\GRAPHISOFT\ARCHICAD version\Add-Ons\BIMx

Default BIMx Desktop Viewer folders:

  • Mac: /Applications/GRAPHISOFT/BIMx Viewer
  • Windows: C:\Program Files\GRAPHISOFT\BIMx Viewer


Can I use Space Navigator from 3D Connexion with BIMx?

No, it is not supported at the moment.


Can I perform a Global Illumination render in the background?

Both in ARCHICAD at the publishing of the BIMx Hyper-model and in BIMx Desktop it is possible to render the Global Illumintation in the background, you can simply alt tab/cmd tab to an other application and the BIMx GI calculation will run in the background.


Does BIMx have Anti-aliasing?

No, it is not supported at the moment on the desktop version, only on the mobile version.

ArchiCAD 18 performance troubleshooting guide

$
0
0

Performance related issues can come from various causes. Most of these issues can be due to the insufficient Software/Hardware availability or the way how the project is created in ArchiCAD. Depending on the nature of the issue you experience check the categories below. For generic issues, please see this article

2D pan and zoom gets slow, laggy and unresponsive when Trace Reference is on

  • Issue:

If you turn on Trace Reference in 2D view, navigation (Pan and Zoom) may become unresponsive, slow and laggy. This is a known issue with the latest update of ArchiCAD 18 (build 6000), on Windows platform.

  • Cause:

If you experience such symptoms, you probably have the Renovation palette turned on. Renovation palette keeps refreshing itself as you navigate in the 2D window, and this constant refreshing causes the navigation to lag, in case you have a complex model, with a lot of snap points (also, the Renovation palette may start flashing).

  • Solution:

Close the Renovation palette while you’re using the Trace Reference, and vice-versa.
Note: We plan to fix this issue in an upcoming update of ArchiCAD 18.

Multiple ArchiCAD instances cause Freeze/Crash

  • Issue:

Multiple ArchiCAD instances can exhaust the RAM. The instance is consuming the memory until ArchiCAD freezes. This issue can occur in any version of ArchiCAD on Windows computers. In some cases Drawing Updates between the two instances lead to crashes as well.

  • Cause:

One possible cause of this problem is an nVidia graphic card related application, called nVidia GeForce Experience. The application disturbs the Inter-process Communication (IPC) between the ArchiCAD instances. The memory being used up is the consequence of this disturbed connection between the two ArchiCAD instance.

  • Solution:

Stop and disable ‘NVIDIA Streamer Service’.

Steps:

  • Launch the Computer Management by right clicking on ‘Computer’ (select ‘Manage’ from the drop-down menu) or you can also open it from command prompt or from Run (the run command for opening: compmgmt.msc)
  • Double Click on ‘Services and Applications’
  • Open ‘Services’
  • Select ‘NVIDIA Streamer Service’ and open the Properties from the drop-down menu by right clicking on the service
  • Click on ‘Stop’
  • Change the Startup Type to ‘Disable’
  • Apply the changes

troubleshooting_nvidia

Note: You must be logged in as an administrator to disable Services.

Note: An update for nVidia driver might enable and start this Service. Please check the Service Properties after installing an update and if it is necessary sotp and disable it again.

  • Solution:

Reconfigure ‘NVIDIA Streamer Service’.

Steps:

  • Open Registry Editor
  • Go to HKEY_LOCAL_MACHINE\SOFTWARE\NVIDIA Corporation key
  • Select MessageBusPort and change its value lower than 65000

Insufficient Software/Hardware

Check here if your setup meets the minimum or recommended software and hardware requirements. This article gives you further – under the hood – information on the recommended hardware setup.

General Speed issues

This article describes how to tackle generic 2D and 3D speed issues in ArchiCAD – what functions and components affect speed and how to fine-tune your system and your ArchiCAD for optimal performance.

Rendering issues

For rendering related issues, please see our Rendering Troubleshooting Guide


ArchiCAD 18 specific issues

Opening of Render Settings and Surface Settings dialogue slow in all localized versions, Windows only

  • Issue:
    When pulling up the Render Settings and Surface Settings dialogue, ArchiCAD is loading a c4d.xml file that causes the window to appear on the interface slowly, possibly only after 6-7 seconds

Screen Shot 2014-06-18 at 16.47.28

  • Solution:

This issue is planned to be fixed in the next regular update.


Complex profiled walls causing slowness

  • Issue:

The presence of a large number of very detailed complex profiles causes slowness by creating an excessive number of polygons and decelarating priority based connection calculations


fig9

  • Solution: 

As a recommended workflow details of complex profiles should be developed in BIM up to a 1:50 (1/4″=1′-0″) scale level.

Remote Key Upgrade

$
0
0

WIBU hardware protection keys (WibuKey and CodeMeter) for GRAPHISOFT products can be remotely programmed via:

If you have recently purchased a GRAPHISOFT product (ARCHICAD, BIMx, MEP modeler, license borrowing option), you will receive an empty keyplug (either a plastic teal-colored key called WibuKey or a metal key called CodeMeter) that you need to “load” through the upgrade site.

If you are an ARCHICAD subscriber, software upgrades are automatically enabled for your key as they are available. You need to use the same site to upgrade your key.


Process

  1. Install the WibuKey or CodeMeter driver from the  GRAPHISOFT’s WIBU download page. Make sure the keyplug is NOT attached while you are installing the driver.
  2. Reboot your computer.
  3. Plug the hardware key into your computer. Make sure only one keyplug is attached at a time.
  4. If you are upgrading a NET key, make sure that no one is using ARCHICAD licenses from that key.
  5. Launch an Internet browser, the best is using: Internet Explorer (on PC) or Safari (on Mac).
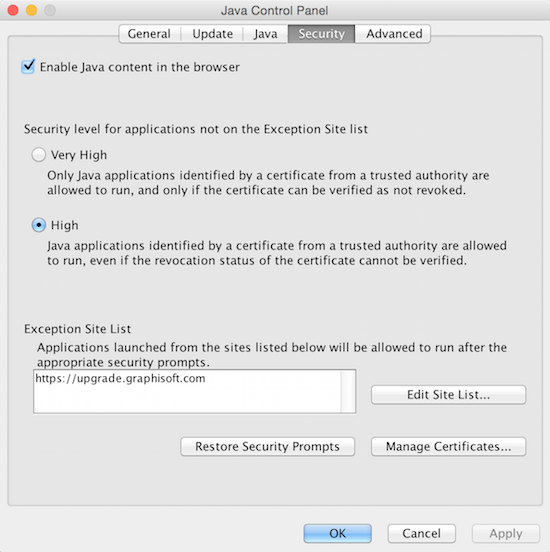
  6. Add https://upgrade.graphisoft.com to the Exception list on Java Control Panel/Securityjava_sec
  7. Visit https://upgrade.graphisoft.com – enable the Java applet when prompted.
  8. Select the preferred language.
  9. Click on the image of the key you have.KeySelector.png
  10. Select the key you would like to upgrade and click on check keyplug. (Products with 128-xxxxxxx format keyplug number are the license files of the software based license borrowing. These shouldn’t be managed here. Choose the keyplug number that starts with 2- if you have a silver/CodeMeter key.)LoadKeyplug.png
  11. In case your selected keyplug is empty, the recently purchased license will appear and be available for programming. Click Upgrade/Load Selected keyplug button at the bottom of the page.LoadKeyplug2.png
    In case your selected keyplug is already programmed, the current content and the content after this programming will appear on the page. Click Upgrade/Load Selected keyplug button at the bottom of the page.LoadKeyplug3.png
  12. Please confirm your choice by clicking OK in the upcoming windows.OK.png
  13. After the confirmation, click Start Programming in the upcoming windows. Please don’t unplug the keyplug during the process.StartProgramming.png
  14. As the last step, the programmed license will appear. Now you can unplug the keyplug.

Troubleshooting

For detailed software requirements and troubleshooting steps see: RemoteKeyUpgrade/Troubleshooting

Accessing an ARCHICAD Protection key remotely

$
0
0

Note: This article describes how to set up the ARCHICAD client computer to remotely access a ProtectionKey shared via the Internet. The server-side setup is described in these articles:

To be able to remotely access a key, you need to know two things:

  • The (external, or public) IP address of the server where the key is shared
  • The type of the key (WibuKey or CodeMeter)

Accessing a WibuKey remotely from a PC

  • Make sure you have the WibuKey driver installed. The driver may have been installed with ARCHICAD already. You can tell this if you go to Control Panel: If you see “WibuKey” in Control Panel, you have the driver. If you don’t, download and install it from here:

    http://www.graphisoft.com/support/archicad/downloads/WIBU.html

  • Note: You might need to restart your computer after install
  • Once you have the driver installed, Go to the Control Panel
  • Double-click on Wibu-key
  • Choose the Network tab
    • 5.png
  • Make sure that the check-box for “WkLan” is checked
  • Make sure that the default port is left (22347).
  • In the lower right area of the tab enter the IP address of the WibuKey Server
  • Press the “Add” button.
  • Press “Ok” or “Apply”.
  • Start ArchiCAD.

Note: If the ‘WkLAN Server Search list’ is empty, ARCHICAD will search for keys available in the local network. If a server address is added to the list, ARCHICAD will only look for free licenses on that specific server. This server could be in any network domain. If there are several entries in this list, ARCHICAD will search for a license on those servers, in the given order. If you don’t want to connect to the remote key anymore, don’t forget to remove the server’s IP address from this list!


Accessing a WibuKey remotely from a Mac

  • Make sure you have the WibuKey driver installed. The driver may have been installed with ARCHICAD already. You can tell this by searching for the application ” WkConfig ” on your Mac. If you have it, you have the driver. If you don’t, download and install it from here:

    http://www.graphisoft.com/support/archicad/downloads/WIBU.html

  • Once you have the driver installed, search for WkConfig (It’s in the Applications/WIBUKEY folder)
  • Launch WkConfig
  • Choose the Client tab

    WkConfigClient.png

  • Make sure the WkLAN option is checked
  • Click the “+” button
  • Type the IP address of the WibuKey server
  • Save and close the WkConfig window
  • Launch ARCHICAD

Note: If the ‘Ordered List of WkLAN Servers’ is empty, ARCHICAD will search for keys available in the local network. If a server address is added to the list, ARCHICAD will only look for free licenses on that specific server. This server could be in any network domain. If there are several entries in this list, ARCHICAD will search for a license on those servers, in the given order. If you don’t want to connect to the remote key anymore, don’t forget to remove the server’s IP address from this list!


Accessing a CodeMeter key remotely (from Mac or PC)

  • Make sure you have the CodeMeter driver installed. The driver may have been installed with ARCHICAD already. You can tell this by looking at the Control Panel (on a PC or the System Preferences (on a Mac). If you see a button for CodeMeter, then you have the driver. If you don’t, download and install it from here:

    http://www.graphisoft.com/support/archicad/downloads/WIBU.html

  • Open CodeMeter Web Admin:
    • On PC, right click on CodeMeter icon on the tray and then click on WebAdmin
    • On Mac, search for the CodeMeter Application (In APplications) launch it, then click on the WebAdmin button in the lower right corner
  • Open the Configuration tab, and then the Network tab
    • CodeMeterWebAdmin.png
  • In the Server Serach List click the Add button and type the IP address of the CodeMeter server
  • Click Apply
  • Launch ARCHICAD

Note: If the ‘Server Search List’ is empty, ARCHICAD will search for keys available in the local network. If a server address is added to the list, ARCHICAD will only look for free licenses on that specific server. This server could be in any network domain. If there are several entries in this list, ARCHICAD will search for a license on those servers, in the given order. If you don’t want to connect to the remote key anymore, don’t forget to remove the server’s IP address from this list!

ARCHICAD license types

$
0
0

See also: GRAPHISOFT Technical Support site


Commercial License

Commercial versions are licensed using WibuKey or CodeMeter hardware or software protection. For full information on commercial license compatibility, see the Protection Key article.

{i} To purchase GRAPHISOFT products or for country specific information you can contact your country representative: http://www.graphisoft.com/purchase

Types of commercial licenses


Full license

With a Full license you can use the fully functional GRAPHISOFT product with unlimited usage. You will be able to run older versions as well. (with some technical limitations for more details see: Protection Key)

Solo license

Solo licenses for Solo ARCHICAD versions are available in the UK and in Japan. Solo version has the exact same functionality as the Full version except it doesn’t include TeamWork, Cinema 4D rendering engine and Hotlink/X-ref capabilities.

Pay-per-use license – PPU

Pay-per-use license type offers prepaid licenses for ARCHICAD, you can buy hours of ARCHICAD usage in advance. When you start ARCHICAD the counter starts and when you quit the program it stops to count. In Help menu/License information you can check the remaining number of hours.
/!\ Running multiple instances of ARCHICAD results faster time consumption e.g. if you have two ARCHICAD sessions running side-by-side then twice as much time will be used from the key. 
{i} Pay-per-use license option is not available on certain markets.

Rental license

With the rental option you can buy a license for a certain time period (1, 3, 6 months). Within the purchased time period you can use ARCHICAD without any limitation e.g. running multiple sessions all day. The usage of this starts when you first start ARCHICAD using a rental license – so not on the day when you purchase it. When starting up ARCHICAD you will be prompted with a dialog stating the remaining days of your license availability. You can also check the remaining days in Help menu/License information.


Demo Mode

ARCHICAD will launch in Demo mode if the hardware or software protection cannot be accessed or there is no free license available. Save, Copy, and TeamWork functions are disabled, but it is still possible to print.


Educational (EDU) License

Education version is a fully functional version that can be installed with a serial number.

The first step of registration gives you a personal temporary serial number and a download link. The process at this level is completely automatic, so you will receive your serial number and the link immediately after you register. This temporary serial number will give you 30-days usage.

After your registration your given credentials go through an approval stage, where GRAPHISOFT’s local representative sends you the final serial that will be valid for 1 year.  When the 1 year license expires you can renew it for free of charge.

  • File Format and Compatibility: EDU and commercial project files will have the same file format (.PLN), but EDU files have an irremovable logo at the top right corner. This logo will be present on all printouts. EDU project files can be opened with a commercial version of ARCHICAD, in which case ARCHICAD switches to EDU mode and the logo will be present. Commercial project files can be opened with an EDU version of ARCHICAD. In this case the logo is added, and cannot be removed later. Saving in the EDU version will prevent the file from opening in the Commercial mode. Besides ‘Open’, no other data exchange (copy, paste, merge, hotlink…) is allowed between EDU and commercial project files.

Trial License

A Trial License can be used to run a fully functional version for 30 days. The license works with a serial number that can be obtained with a simple registration.

  • Registration: A serial number can be obtained by registering at https://www.myarchicad.com/.
  • File Format and Compatibility: Files written by the trial version are encrypted and can only be opened on the computer where they were created. After the 30 days period the save function is disabled, but it is still possible to print. The files can be converted to full files by purchasing a commercial license and opening with the protection key on the computer they were written.

{i} As Trial files can only be opened on the same machine where they were saved TeamWork functionality is available – but limited.


START Edition

ARCHICAD STAR(T) Edition is based on the industry leading Virtual Building technology of ARCHICAD but its feature set is tailored to the needs of small architectural practices. For details of the features in the current version see START Edition.


BIMx

For BIMx license options see: BIMx/LicenseTypes


EcoDesigner STAR

EcoDesigner STAR is based on ARCHICAD’s built-in Energy Evaluation feature, but provides significantly extended capabilities and data settings.

In order to access these extended functions you must have ARCHICAD 17 build 5019 or newer and have an EcoDesigner STAR license key. Apart from inserting hardware protection key or downloading software protection key, no additional installation or download is necessary.

Please contact your GRAPHISOFT Partner for further product information and purchase details.


File compatibility between different License types

    License Validity     Save file?         Open file?          Teamwork       
Full      Indefinite Can save for current versions and back-save one version Any version Yes
Demo Indefinite No Open and view any ArchiCAD PLN file No
Trial 30 days Save as Trial version, on the same computer only Open Trial version file, on the same computer only Yes, for Teamwork projects shared in Trial version, on the same computer
EDU 1 year (renewable); 30 days without proof of student status Save as EDU version only: Permanent watermark appears on all output Open commercial file with EDU (watermark appears)
Open EDU file with commercial (watermark appears)
Yes, for Teamwork projects shared in EDU
Solo Indefinite Save as Solo version, can be opened with Solo and Full Open and view any ArchiCAD PLN file No. (Contains other feature limitations.)
Start Edition Indefinite Save as Start Edition version, can be opened with Start Edition and Full Open Start Edition version file No. (Contains other feature limitations.)

Replacing Hardware Keys with Software Keys

$
0
0

Before You Begin

  1. To replace your hardware (WIBU) protection keys with software protection keys, you will use the GRAPHISOFT License Manager Tool. Download and install this program from: http://www.graphisoft.com/downloads/licensing.
  2. In order to manage software protection keys, you must have a GRAPHISOFT ID. Obtain your GRAPHISOFT ID by registering at the https://graphisoftid.graphisoft.com/#/register website.
  3. Your local representative provides you with a list of hardware (WIBU) keys to be replaced, plus a unique Authentication Key that validates your company identity and gives you access to your new software protection key(s). Keep this information with you during the replacement process.

Step-by-Step Key Replacement

  1. Start the License Manager Tool and Sign in with your GRAPHISOFT ID:Sign-In
  2. In the appearing dialog box, enter your Authentication Key.Authentication-Key
  3. The Create Company Account dialog box appears.Company-AccountEnter the name of your company and click ACCEPT to become your company’s Admin, who will manage the company account.
    Note: You will enter the Authentication Key and create a Company Account only once.
  4. Plug in the hardware (WIBU) protection key that you are replacing into your computer.
  5. From the appearing list in the License Manager Tool, select the hardware key and press Continue.Continue
  6. The Update Multiple Keys dialog box appears, listing the Source key (the hardware key) and the Target key (the new software key, located in the cloud-based Company License Pool, which will replace it).Target-Key
  7. Click Start to begin the key replacement process.
  8. Once the process is finished, you can download the new software key to your computer: select the software key from the list and click Download.Download
  9. The program will notify you once the key has been successfully downloaded to your computer.Successful-Download
  10. The key and its licenses are ready to use. Press Quit to exit the License Manager Tool.

Notes:


Connect ARCHICAD License

$
0
0
With ARCHICAD 19 we introduced a new option which allows the users to connect their personal GRAPHISOFT ID  to their GRAPHISOFT ID company based on the protection key running ARCHICAD.
Once the personal GRAPHISOFT ID is connected, users can access SSA-exclusive web pages.
Later we will also use GRAPHISOFT ID to log into Help Center.
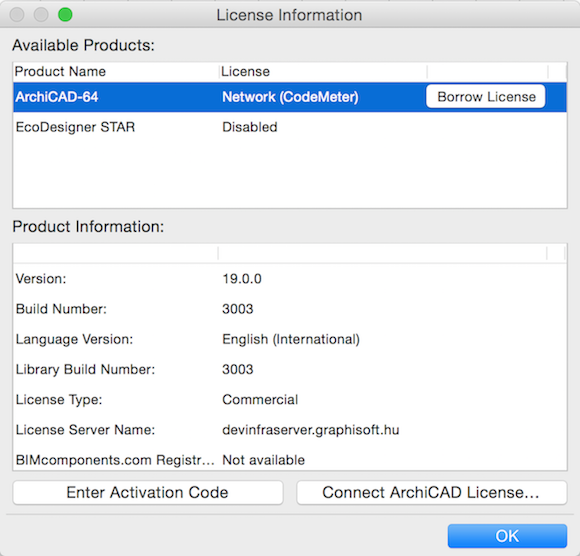
  • Open the ARCHICAD/License Information dialog and click on the Connect ARCHICAD License… button.

connect_AC_license
  • Sign in

M-260_sign_in

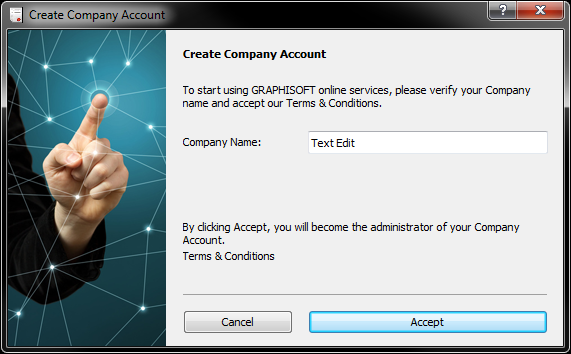
  • Create Company Account

(In case the Company hasn’t been created yet.)

M-260_create

Enter the Company name and click on Accept.

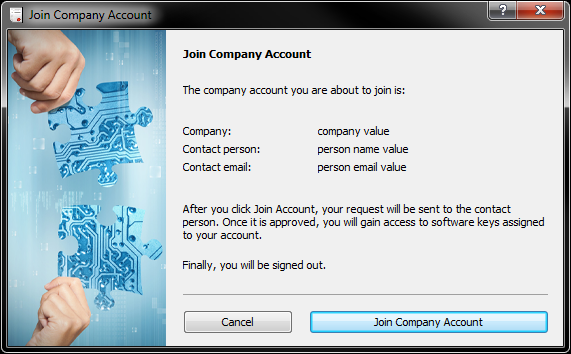
  • Join the Company Account

(In case the Company already exists.)

M-260_join

After clicking on the Join Company Account users will be signed out.


Once the GRAPHISOFT ID is connected to the GRAPHISOFT ID Company, the ARCHICAD automatically recognises at the next sign in.


ArchiCAD 17

$
0
0

ArchiCad17.png


ArchiCAD 17 was announced on May 7, 2013.

“BIM Lives in the Details” is the main theme of ArchiCAD 17.

ArchiCAD 17 contains significant enhancements and additions that simplify the modeling and documentation of buildings even when the model contains an unprecedented level of detail. ArchiCAD’s end-to-end BIM workflow allows the model to stay live till the very end of the project. The new features are: Priority Based Connections, Industry-first Background Processing, Extended IFC Model View Definitions, BIMobject® Partnership and Workflow Improvements.

See the product page on GRAPHISOFT site


Hard Core BIM – Watch the video series


Priority Based Connections – Watch the feature video


Compatibility

See also: System Requirements for ArchiCAD 17

ArchiCAD 17 system requirements:

Note: 32-bit operating systems are not supported.

Note: ArchiCAD 17 is the last version of ArchiCAD to support Mac OS X 10.6. Only case insensitive file-system volumes are supported.

Requirements for BIM Server:

  • Windows Vista – 64-bit versions*
  • Windows 7 – 64-bit versions
  • Windows 8 – 64-bit versions
  • Windows Server 2008 – 64-bit versions*
  • Windows Server 2008 R2 – 64-bit versions
  • Windows Server 2012 – 64-bit versions

Note: Only case insensitive file-system volumes are supported.

  • * Suitable for running ArchiCAD 17, but not tested by GRAPHISOFT.

ArchiCAD 17 can open or import the following file formats: See all the file formats that can be used with ArchiCAD here.

  • ArchiCAD projects (.pln, .pla, .bpn, .mod, .tpl, .plc, .pca) from ArchiCAD 8.1 or newer
  • ArchiCAD objects (.gsm) from ArchiCAD 4.55 or newer
  • PlotMaker layout Book (.LBK) and drawing (.PMK) files
  • IFC 2×3, IFC 2×3 compressed, IFC 2×3 XML, IFC 2×3 XML compressed – 2D and 3D content
  • DWF – 2D content
  • DWG (2000 to 2010) – 2D and 3D content
  • DGN (Microstation Design file) v7 – 2D content
  • 3DStudio (through the “3D Studio In” goodie tool) – 3D content
  • SKP (Integrated Connections with Google Earth, Sketchup) – 2D and 3D content
  • KMZ (Integrated Connections with Google Earth, Sketchup) – 2D and 3D content
  • STL (Stereolitography)
  • C4D (Cinema4D R12+ files through the Cinema 4D add-On) – 2D and 3D content
  • PDF
  • PICT vector images
  • EMF, WMF, XYZ – surveyor’s data
  • various raster image file formats (SGI*, PSD*, BMP, JPG, JP2*, PNG, PCT*, TIF, GIF, TGA*, QTIF*)

* Beginning with ArchiCAD 15, QuickTime-based images are being phased out. ArchiCAD 17 will still read all Quick Time formats, but later versions may not..

ArchiCAD 17 can save or export the following file formats:

  • ArchiCAD 17 Solo Project file (.PLN), Project archive (.PLA), and template (.TPL)
  • ArchiCAD 17 Project (.PLN) file
  • ArchiCAD Module (.MOD) file
  • ArchiCAD object (.gsm) (ArchiCAD 17-equivalent)
  • ArchiCAD object (.gsm) version 27 (ArchiCAD 16-equivalent), through saving a PLN with embedded library to ArchiCAD 16 format
  • ArchiCAD object script (.GDL)
  • ArchiCAD 2D Lines (.2DL)
  • ArchiCAD drawing file (.PMK) through the publisher when publishing Views
  • PDF, PDF/A
  • EMF, WMF
  • DXF
  • DWG (2000-2010 format, 2D and 3D)
  • DWF
  • DGN
  • IFC 2×3, IFC 2×3 compressed, IFC 2×3 XML, IFC 2×3 XML compressed
  • 3DStudio 3D studio file
  • SKP (Integrated Connections with Google Earth, Sketchup)
  • KMZ (Integrated Connections with Google Earth, Sketchup) – 2D and 3D content
  • C4D (Cinema4D R12+ files through the Cinema 4D add-On) – 2D and 3D content
  • OBJ Wavefront file (3D)
  • EPX Piranesi File (3D)
  • FACT ElectricImage file (3D)
  • VRL VRML file (3D)
  • STL Stereolithography file (3D)
  • LP Lightscape file (3D)
  • ATL ArtLantis Render Studio file (3D)
  • U3D file (3D)
  • various image formats (BMP, JPG, PNG, GIf, TIF)

See all the file formats that can be used with ArchiCAD here.


License Types

ArchiCAD 17 comes with several license types:

  • Commercial license requires a WibuKey or CodeMeter hardware protection key
  • Trial license is a fully functional 30-day license that can be downloaded from http://myarchicad.com and comes with a license number
  • Demo version does not require neither a hardware key nor a license number. All save/export options are disabled, but printing is possible.
  • Education license is available through http://myarchicad.com. A 1-year license number is available upon approval.
  • Pay-Per-use (PPU) license requires a hardware key. PPU license lets you run ArchiCAD for the number of hours purchased. (not available on all markets)
  • Rental license requires a hardware protection key. A Rental license lets you run ArchiCAD for 1,3, or 12 calendar months.
  • License Borrowing – available from ArchiCAD 16 – when a temporary ArchiCAD Commercial license is borrowed from a multi-license CodeMeter protection key.

New Features


Modeling

  • Automatic Model-Based Junctions
    • Priority-Based Connections Available for All Construction Elements
    • Other Improvements for Better Intersections
  • Link Element Height to Stories
    • Enable the height of walls, columns and zones to be linked to a particular story: when the story position changes, the heights of the linked elements are automatically adjusted. This way, you do not have to manually adjust element heights every time the story height changes.
  • Core-Based Reference Line
    • for walls and slabs: Option to assign a reference line-plane not just to either side of the wall, but also to either side of the wall’s core skin, or to the top/bottom of the slab core.
    • Use the new Modify Wall Reference Line/Slab Reference Plane dialogs (replaces Wall Extras) to relocate reference line/plane without moving the geometry.


  • Curved Beam
    • Use the Beam tool to create beams that are curved on a horizontal plane. Thus, beams can serve as support structures along curved walls.


  • More Intuitive Element Creation in 3D Window
    • In the 3D window, element input takes place at the elevation at which you click; the input plane snaps to the corresponding story level in space.
  • Anchor Door/Window Reveal to Wall Core
    • Anchor the Door/Window reveal to either the Wall face or the Wall core.


Workflow

  • Building Material
    • The new “Building Material” attribute, which combines cut fill, surface material, priority, physical property and pens, is defined globally, then applied to any construction element, simplifying the user interface and allowing the same cut fill to be used consistently throughout the model.
    • At element level, pens and surfaces can be overridden as needed, including for Profiled elements.
    • Improved visualization of Building Materials on Composite and Profiled Structures in 3D.


  • Easily Editable 3D Cutting Plane
    • Define 3D cutaway sections of the model graphically, using one or more cutting planes in any location.


  • Improved Door/Window Placement
    • opening location
    • anchor point
    • reveal side
    • opening direction
  • Enhanced Composite/Profile Workflow
    • Select any Profile or Profile element in any view, then right-click to access the relevant Composite or Profile Settings directly.
  • Floor Plan-Based 3D Document
    • With a single click, create a 3D Document based on the Floor Plan: a section view, based on a horizontal cut plane in the Floor Plan window. Define the projection by setting a cut plane height and the projection direction either upwards (toward the ceiling) or downwards (to the floor). This type of 3D Document shows the cut part of the model, including sections of vertical structures (e.g. walls, openings). Interface and settings are based on the 3D Document.


  • Improved Zone Creation and Editing
    • New Zone input methods
    • Keep Zone Area Fixed while Editing
  • Smarter Attribute Management
    • After migration to ArchiCAD 17, using file merge or working with hotlinks, you may need to get rid of the unneeded attributes (e.g. layers, line types, fill types). A new workflow for attribute management helps save you time and prevent costly mistakes, allowing you to safely delete and replace attributes
      • Delete and Replace: After deleting an attribute from its Settings dialog box, you can define which attribute should replace it throughout your model (available for Building Materials, Line Types, Fill Types, Composites, Profiles, Surfaces, Zone Categories)DeleteReplaceLine.png
      • Delete Layers and Move Elements: After deleting a layer in Layer Settings, you have the option to replace it with a different layer. In this case, the elements from the deleted layer are placed onto the layer you specify.DeleteMove.png
    • If you are migrating multiple similar project files to ArchiCAD 17, the Replace Attributes by File function can help you speed up the migration process: it automates the Delete and Replace attributes function.See a description of this process at AttributeMigration.
  • Better Management of Hotlinked Modules
    • Now you can define a custom Master ID to every Hotlinked Module instance.
  • PDF/A Support
    • As of ArchiCAD 17, it is possible to save or publish views, layouts, publisher sets or the entire project in PDF/A format, a standard format for archiving purposes.
  • Export ArchiCAD Model to STL Format
    • You can directly save the ArchiCAD model as an STL file. An STL file carries only the surface geometry of a 3D model, divided into triangles, without any additional information (e.g. color, material).
  • Integrated Connections with Google Earth, Sketchup
    • Open or merge models from Google Earth (.kmz) or Sketchup (.skp) directly into ArchiCAD, or save the ArchiCAD models in either of those formats: the related add-ons are now fully integrated in ArchiCAD and require no extra downloads
    • Use File > File Special > Send Model to Google Earth for a one-step viewing experience
    • When merging a model to ArchiCAD, the user can choose between using the imported location coordinates, or retaining ArchiCAD’s Project Location data and placing the new data relative to these coordinates
    • If you only need the location data, you can import the location data stored in the .kmz or .skp file straight into your ArchiCAD model by using the Project Location dialog box


  • One-Step Renovation Status Update for All Elements
    • When a renovation project is finished, you will need to update all elements’ renovation status: for example, those that were “To be Demolished” can now be deleted; those that were “New” are now “Existing”.
  • Conceptual Design
    • New Morph scheduling features support conceptual design and mass modeling.
      • List the volume and area of Morphs separately by story (even as the multi-story Morph remains a single element).
  • Improved Tool Settings Interface

Open BIM

See also: OpenBim

  • IFC Improvements
    • Support for Multiple IFC Standards
    • IFC Publishing
    • Other IFC-related Improvements
  • Saving Elements to Common DWG Blocks
    • Until now, multiple instances of a single GDL Object – if they used varying parameters – were saved as separate DWG Blocks. As of ArchiCAD 17, such GDL objects will be saved as a single DWG Block. This way, you only have to edit a single block in AutoCAD, rather than multiple instances.


Energy Evaluation

See also: EnergyEvaluation

By introducing multiple thermal blocks to the Building Energy Model, Energy Evaluation for ArchiCAD 17 produces an increasingly sophisticated and accurate report of the project’s energy demand, using a standard-compliant engine. An expanded interface and new evaluation features take advantage of the more detailed data provided by multiple thermal blocks (instead of the single-block method used in ArchiCAD 16).

  • Easy Creation and Visualization of Thermal Blocks
    • A project’s Thermal Blocks are defined by the user; their geometry consists of one or more ArchiCAD zones. Each Thermal Block (e.g. Stairwell, Office, Basement, Technical Area) typically has its own energy characteristics and needs.
  • Streamlined Management of Structure/Opening Data
    • Use the Model Review Palette’s new Tree View to browse, edit and visualize the Openings/ Structure data, organized by Thermal Block
    • Properties panel provides editable list view
    • Openings page provides individual analysis (listing, editing and visualization) of each opening
    • More detailed parameter set allows for a more accurate energy simulation
  • Model-based Solar Irradiation Study
    • Model-Based Solar Irradiation Study determines precise solar gain through each individual opening in the building envelope
    • Graphical Solar Analysis feedback for each opening
    • Solar analysis also considers shading effects of building environment (e.g. adjacent objects, other buildings)
    • ArchiCAD plant objects act as intelligent shading devices: their shading capacity is scheduled for the reference year, making it possible to factor in whether the plants used for shading are coniferous or deciduous
  • Custom Operation Profiles
    • Define custom Operation Profiles (in addition to default profiles) to fine-tune occupancy according to local regulations or to match actual building usage
    • Hourly scheduling for the entire reference year guarantees accurate input of occupancy patterns
  • Assign Multiple Building Systems
    • In ArchiCAD 17, assignment of MEP systems is available for each thermal block separately – not just for the project as a whole. The resulting Energy Simulation thus presents a more realistic picture of the project’s energy demand.
  • More Detailed Energy Reports
    • More detailed energy reports in PDF and XLS formats
    • New formatting options, including colors, font, add image as header


Library Enhancements

Please note: Some new Library part developments are available in certain localized libraries only.

  • General Library Developments
    • To speed navigation among objects, similar library parts have been merged, while retaining all their parameters.
    • Some objects have been renamed to eliminate confusing abbreviations.
    • A new criterion allows library parts to be scheduled based on the name of the subtype they originate from.
  • Objects
    • Coordinate Dimension
      • The Coordinate Dimension object now has a 3D appearance, so that you can easily place it on the target point by using gravity.
    • Stairs and Railings
      • New 2D appearance for stairs and simple railings, similar to those created by Stair Maker.
    • RoofMaker Elements
      • Roof elements used by RoofMaker have a new graphical user interface.
      • Lumber Cut Size and Rounded Lumber Size values are calculated automatically.
      • Structural Length, Lumber Size and Lumber Size (rounded off) are displayed correctly and available for listing and schedules.
      • Subtype-based schedule scheme for Roof construction elements can be created.
    • New Object: Multileader Label Symbol
  • Labels
    • The Dimension label can display an element’s bottom and top elevation
    • The label was improved with a user interface for better transparency
  • Zone stamps
    • More Flexible Zone Stamp Data Display for Zone Stamp 2 and local stamps.
  • General door/window developments
    • Improved Placement of Doors/Windows
    • New closure types
    • Better Documentation of Openings
    • Sill and Threshold Improvements -> DACH only
    • Casing representation -> NOR only
  • Doors
    • New Doors
    • New Door Leaf Types
    • Improvements for Doors with Sidelight
    • Improved 2D Representation of Doors
    • More Parameters for Sliding Doors
    • Garage Door Enhancements -> DACH only
  • Windows
    • Basic Window improvements
    • New Sash and Opening Types for Windows
    • Better Opening Symbol for Elevation and 3D
    • Window Frame Improvements -> SWE, DACH only

ArchiCAD Performance Improvements

  • Faster Navigation with OpenGL
    • When navigating in large projects in the 3D window using Open GL, an improvement in 3D engine processes has speeded up navigation: up to ten times faster.
  • Improving SEO Performance
    • If your project contains a large number of Solid Element Operations, your performance will improve noticeably – due to more sophisticated data management, which avoids the need to recalculate Solid Operations that are used multiple times.
  • Double-Quick Library Loading Times
    • Library loading is now twice as fast! If you have loaded a library on this machine before, the next load will be much speedier, thanks to new caching processes. Works for any kind of library.
  • Better Performance with Older-Version Libraries
    • If you are using library parts from older-version libraries and older-version PLA files, the 2D rebuilds and 3D display of these library parts will speed up – thanks to improved management of archival library part data.
  • Faster Handling of Library Parts’ 3D models
    • The handling of library parts’ 3D models has been improved on a multicore processor: when you switch to a 3D view, the view can be generated up to 50 percent faster, depending on the number of library parts in the project.
  • Background Operations for Faster 3D
    • ArchiCAD uses background operations to calculate the precise geometry of construction elements which intersect or collide with each other. Background operations means that you can, for example, work on a floor plan view while the application calculates the geometry of elements not visible in the current view – without interrupting your workflow. Benefit: when you switch to another model view, the result will be displayed much faster.

Notes on possible change of file size from ArchiCAd 16 to ArchiCAd 17

ArchiCAD17 uses a different file format compared to previous AC versions.

  • files are optimized for reading and saving speed, not for file size.
  • opening and saving speed is already faster than in version 16, but the new file format offers possibilities to reach even speedier results in the future after some perspective development.
  • at open ArchiCAD does not read all the data of the file, only the necessary data to start
  • at save ArchiCAD does not write all the data of the file, only the data that changed since the last save
  • compared to the old format AC17 stores more data to support quick opening of files
  • instead of generating elements tied to hotlinks and xrefs, the 17 file contains these
  • in the case of damaged files, we are able to restore data in more instances. The repair function can be reached through the Open/repair file checkbox
  • the previous 2GB limit to filesize does not apply anymore, the computer’s capacity is the only limit


File size changes caused by Save and Open & Repair

ARCHICAD users sometimes notice changes of the file size after Save or Open & Repair without having previously changed anything in the project. The reason for this is that project files contain “empty” parts without any useful project data as well.  These are necessary for maximizing the speed of saving. If the size of these “empty” parts exceed a certain value or more empty space is needed within the file the program compacts the file or increases its size. So if useful project data size increases by a certain amount it will not automatically increase the size of the file by the same amount. The same is true for reducing the data and/or file size. The only file format that is completely free of such “empty” parts is PLA. When repeairing the file with Open & Repair the program rebuilds the database of the project, which can cause that the size of the file changes even if there were no corrupt data to delete.


OPEN BIM

ARCHICAD

BIMx

Collaboration

Modelling


Library

Visualization

Documentation

Attributes

Recommended hardware for GRAPHISOFT products

$
0
0

General Recommendations

System Requirements

Platform

All GRAPHISOFT products are available on Windows and Mac platforms as well. BIMx has both iOS and Android based version for mobile devices. Choose the platform according to your taste, the two versions (Mac and Win) are fully compatible (file formats, TeamWork) so you can even have Macs and PCs running side by side in your office.

Useful information

Known Issues


ArchiCAD

CPU

With the implementation of CineRender engine by Maxon in ArchiCAD 18 a high performance CPU becomes even more essential than before. Besides rendering, the industry-first Background processing (available from version 17) uses multiple cores intensively. Background processing greatly helps the performance, navigation and display of extra-large, complex models. We recommend at least 4-core processors for standard BIM workstations, but 6-8+ cores can be optimal for the calculation of larger projects and quick rendering. It is worth keeping in mind though that prices rise exponentially with performance. For rendering speed – CineRender, Cinema 4D, Artlantis, the CPU is the most important component, so on computers doing all day renderings a high end processor is a good choice but on all other computers (not only used for rendering – regular BIM workstations) better invest more on the other parts.

RAM

ArchiCAD supports 64-bit on both platforms. To see the benefits of this, you need more than 4GB of physical RAM – 8 GB+ is recommended nowadays. While most of the times ArchiCAD will use significantly less than this, since RAM is now cheap there is really no reason to economize here. There are times when you will run multiple copies of ArchiCAD or run other applications simultaneously.

 From ArchiCAD 17 only 64-bit operating systems are supported. All current Windows versions (Vista, 7, 8) have 64-bit versions, OS X 10.6 and newer versions are 64-bit compatible.

Storage

ArchiCAD stores cached data while it operates, so there is a lot of file I/O going on while working in ArchiCAD — not just when saving files. Therefore hard drives are a key — and often overlooked — speed factor. With the price of solid state drives coming down every year, they might be a sensible investment. You don’t need a huge SSD. You are better off with a smaller (say 128GB) SSD combined with a large conventional hard drive. You will install the system and ArchiCAD on the SSD, but you will store files on the conventional drive.

Check our brief SSD benchmark results: SSD

Video Cards

ArchiCAD uses hardware acceleration in both 2D and 3D. That said, while the importance of hard drives is often underrated, video cards are often overrated. In general we can say that it is more important to have a recent video card than a particularly high-end video card. It’s not a bad practice to replace the video card at the half of your computer’s lifespan.

When you buy a new card, it’s important to have enough video RAM. We currently recommend 1GB. Drivers are key for optimal performance. If you want to have a peace of mind about drivers, you might consider going with a “professional series” video card — at a much heftier price. You can find a list of recommended cards in our knowledge base.

Displays

Screen real estate is a huge productivity factor. Here we have only one recommendation: The bigger the better. You can also hook up two or more monitors, if your video card supports that. You can even have more video cards to support all of your displays.


BIM Server, BIMcloud Server

CPU

For the BIM Server and BIMcloud Server the CPU is an important factor, though the current mid-range CPUs can provide enough performance. Choose a Quad-Core system for the best price/performance value.

RAM

8 GB for BIM Server, 16 GB for BIMcloud Server is strongly recommended. On servers that are serving many TeamWork users or running large projects having 16/32 GB can easily produce its cost back – as RAM is relatively cheap and can speed up the overall performance.

Storage

For the BIM server this is the most important factor. As the server deals with large databases, huge caches for each connected TeamWork users a fast storage solution can dramatically speed up the overall TeamWork performance.

Ways to improve the performance:

  • Use fast 7200+ RPM HDDs
  • Use HDDs in RAID units. With that you can have better performance and also enhanced data security. For available RAID options see the RAID article on Wikipedia. The most popular options are: RAID 0 (no redundancy), RAID 1 or the combination of these with 4 HDDs – RAID 1+0 or RAID 0+1 or RAID 5.
  • Use SSDs
  • Store the OS and BIM Server on one drive libraries and project databases on another (or even these two can be separated to different drives)

Some examples ordered by performance (ending with the fastest solutions):

  • One HDD that holds all data
  • Separate HDD that holds the OS and the BIM Server and a separate one that holds the databases (library and project). This means physically independent storage units not partitioned single HDDs
  • A HDD that holds the systems (OS + BIM Server), 2 or more HDDs in a RAID unit for the databases
  • A SSD as the system drive (OS + BIM Server) and 2 or more HDDs in a RAID unit for the databases
  • A SSD as system drive (OS + BIM Server), 2 or more HDDs in a RAID unit for the databases
  • Mac only: an iMac with SSD (OS + BIM Server), databases stored on an external RAID unit connected via Thunderbolt.
 The best is having internal drives as storage for the BIM Server. In case external drives are used, like Thunderbolt based storage solutions make sure that the BIM Server does not start with the operating system as the OS might mount the drive later than the BIM Server is started. For more details see the General BIM Server Configuration Guide

Video Cards, displays

As BIM Server is a server application it does not require 2D or 3D acceleration. You can use even an integrated solution that comes with your motherboard. Also you can even run the server without connected displays and access the computer via remote desktop.

Virtual machines

Many servers are running as virtual machines hosted on physical computers. BIM Server can also work in that way but note that it requires a really fast storage solution. In case the host hardware runs more HDD intense guest machines, like MySQL servers and such the simultaneous HDD access can drop the TeamWork performance. To avoid performance problems the best is having a separate storage unit that serves only the virtual machine that runs the BIM Server.


BIMcloud Manager

CPU

BIMcloud Manager does not require extreme CPU performance. Use a 2+ core 64-bit compatible CPU for the best performance.

RAM

4 GB

Storage

5 GB free disk space is required for the installation.

In case the BIMcloud Manager and a BIMcloud Server is installed on the same computer, make both system requirements are met.


BIMcloud Proxy

CPU

64-bit processor with four or more cores

RAM

16 GB or more is recommended

Storage

10 GB free disk space is required for the installation. During the installation you can specify the amount of disk space the proxy is going to use for caching. The default value is 40 GB, so make sure there is enough space for that. Later this value can be change by running the ‘Reconfigure v18 Proxy’ utility from the BIMcloud folder.

The speed of the storage is as important for the Proxy as for the BIMcloud Server, so consider the solutions explained there.


BIMx

From the point of view of BIMx we should separate the related computers, devices to two groups:

  • the computers where the BIMx model is exported and Global Illumination render is performed
  • the devices that can open and play the BIMx model

CPU

Up to ArchiCAD 15 the Global Illumination render is performed by the CPU. Starting with ArchiCAD 16 this load is shared between the GPU and the CPU. As the majority of the render is calculated by the GPU, any mid range CPUs should just work fine. For the second group any recent CPUs should be good even low-range ones.

Memory

Even the largest models can be opened with 4 GBs of RAM. Note that between iOS devices only the latest ones has enough RAM to open large models (iPad 3 and 4, iPad Air, iPad Mini 2nd gen., iPhone 5 and 5S has 1024 MB RAM).

HDD

Any current storage device should be fine for BIMx.

Video Cards

As BIMx is a graphics intensive application the most important factor is the video card and the amount of the available video memory. A large project with Global Illumination rendering may require more than a GB of video RAM. You can check the required memory at the Global Illumination settings after clicking Initialize. As the Global Illumination render is calculated mostly by the GPU you might want to consider a newer card – mid range and above. You can find a list of recommended cards in our knowledge base.

You may want to optimize your model to run on even on entry level computers or on mobile devices. For techniques see: BIMx/Optimization


This article is based on the following previously published articles, with updated and extended content:

Viewing all 1140 articles
Browse latest View live


<script src="https://jsc.adskeeper.com/r/s/rssing.com.1596347.js" async> </script>